Odds are you have some fond memories of college. Odds are also that you remember doing something you’re not very proud of during that time. I know I do. In my junior year of college, I signed up to undergo one of those medical testing studies that seems to lure so many undergrads and other assorted weirdos into its sterile, scrubs-laden clutches with the promise of a quick $1,000+ in exchange for you to become a human guinea pig for a weekend.
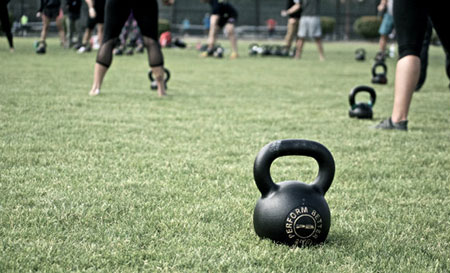
That in and of itself isn’t what I’m not proud of (at the time it was the fastest $1,000 I’d ever made; don’t judge). Far from it. What shamed me that weekend was the sad predicament I found myself in—nay, created for myself. After being told I couldn’t bring a kettlebell into the facility with me to workout and pass my time during the weekend—and yes, I asked—I thought to myself, “No problem, I’ll just figure out something else to do.” How wrong I was.
At the time, I was familiar with bodyweight training, having read Pavel’s pedestal-worthy classic The Naked Warrior. I had done pistols before and had feasted on a face full of dirt more times than I could count after hurriedly attempting (and failing at) one-arm pushups. I had no patience and was certainly lacking a hefty amount of foresight. Because I always had a kettlebell handy, I relegated calisthenics to the side, thinking I’d learn more about it “one of these days” when I had more time on my hands.
That weekend, locked in that clinic, the time had come. And this naked warrior was completely unarmed and caught totally off guard. I lost a decisive and quick battle that weekend, and my punishment was to spend a long three days as a shiftless lay-about watching bad movies and avoiding the other walking medical experiments.
What Would You Do Without Your Kettlebell?
As with most early twenty-somethings, it took me a long time of making the same mistake over and over before I learned my lesson. But I’m proud to say I’ve learned it well and have since taken on calisthenics training as a serious discipline, and I’ve been reaping the rewards ever since—in terms of health, physical development, and, of course, strength.
One of the major things I learned that weekend—and something it seems every strength fanatic learns the hard way at some point or another—is that lifting yourself into a very narrow corner will stunt your physical development on two fronts: first, in terms of your overall gains, and second, in terms of what you can get accomplished in less-than-favorable circumstances.
The sad truth is most of us are still lost without our kettlebells. Most of us are lost without our barbells. But no matter how lost you get, you will never be without your body weight—and that means your strength doesn’t have to get lost along with you.
So how do you work on continuing to get stronger when you are limited to next-to-no equipment, save for the ground, a wall, and something to hang on?
The program contained later in this article will address just that—how to get freakishly strong on a carefully crafted and logically progressed skeleton crew of exercises: a push, a pull, and a squat. But in order to take advantage of this program, you must first realize two things:
- You are, in fact, unlimited in your options with that skeleton crew of “equipment” and exercise selection.
- Being “equipment-less” is a golden opportunity to take advantage of what calisthenics does best: forces you to be creative, fill your training gaps, and build a strong scaffold for future kettlebell and barbell success.
Step 1: Perfect the Hollow Position
“If I had two hours to cut down a tree, I’d spend an hour and a half sharpening my axe.”—Abraham Lincoln
At StrongFirst, we place a premium on fine tuning the basics for the simple reason that everything else is built upon them. And what could be more basic than learning (or perhaps relearning) how to generate tension from nothing and how to maintain the proper body position for the techniques in question? (The answer is “nothing,” for those keeping track at home.)
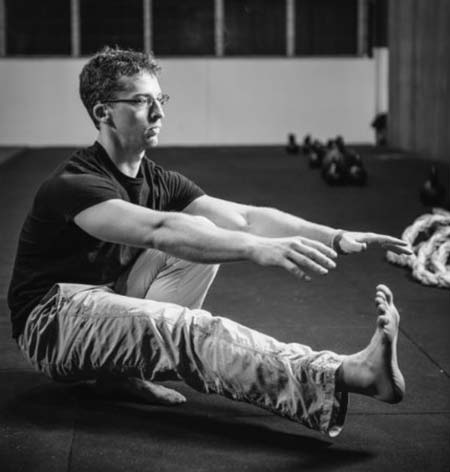
For the record, the photo below shows the hollow position: an open C-shape of the body, with the distance between the sternum and the navel shortened, and everything between the fingers and the toes held tight as possible. Because there are plenty of fine details that go into this otherwise simple position—details that are beyond the scope of this article—you’ll get only a crash course here (attend an SFB Course or SFB Certification to dive deeper into the details).
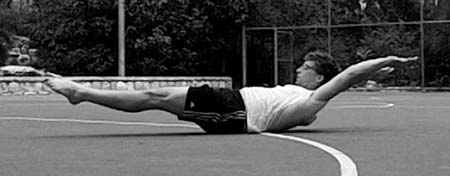
To get into the hollow position:
- Lay on your back, lift your head to look at your belly button
- Point your legs toward the sky and lower them until it feels like your legs are resting on your butt
- Extend your hands overhead
Holding this position alone will ratchet up the tension in your body, but a few simple drills, such as squeezing a towel between the legs, crushing a towel with the low back, and pressing your hands together will send the tension levels sky high. This will come in handy not only for the bodyweight exercises you’ll be practicing, but will have an unbeatable carryover into your favorite barbell and kettlebell exercises.
The hollow position will apply in varying degrees to nearly all the major bodyweight strength exercises and you will need it to ensure the proper linkage, tension, and control in each move, so don’t gloss over it.
Step 2: Learn the Moves
In The Anytime, Anywhere Bodyweight-Only Strength Program, you’ll have three main days wherein you’ll work each of your three major movements—a push, a pull, and a squat—at varying intensities. You’ll also have two optional variety days to fill in the gaps and scaffold your success at your main movements.
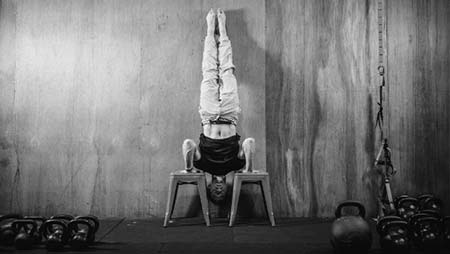
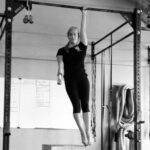
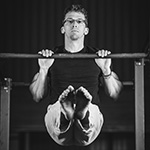
For the pistol, you can remain perfectly hollow throughout. With the pullup and handstand pushup, for both performance and shoulder health reasons, I would recommend you open your chest a bit. Your abs, glutes, and legs, however, should stay locked down for strength, tension, and control.
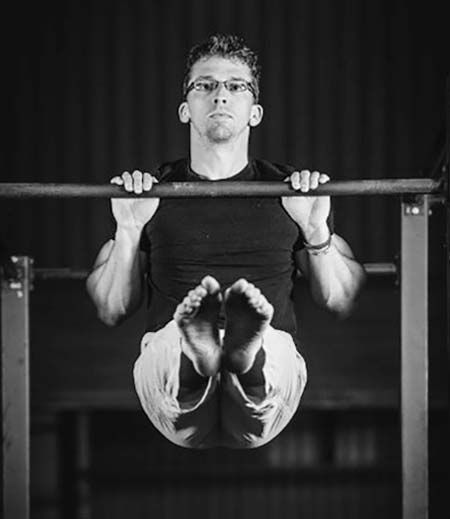
The pistol and the pullup make perfect sense as the go-to squat and pull exercises in a bodyweight-only program for a variety of reasons so blindingly obvious they don’t even bear repeating in this short article, but you might want to know why I’d go with handstand pushups over one-arm pushups in a program like this.
The answer is simple: from my experience, one-arm pushups respond best to lower volume, plenty of rest between sets, and a grease-the-groove or Easy Strength schedule. Trying to cram a move that requires the level of tension, precision, and technical skill as the one-arm pushup does into a higher volume program is a recipe for disappointment.
What’s more, your stabilizer muscles such as your quadratus lumborum and hip rotators probably won’t appreciate the double shot of demands placed on them by both higher volume pistols and one-arm pushups in a single program. If you’re really proficient at them, by all means, give it a shot, but in my correct opinion, you’ll be better off with handstand pushups.
Step 3: Understand the Rep Scheme
A rep scheme I like and that allows you to get a lot of volume in a relatively short amount of time while still focusing on strength is the following (all listed as sets x reps)
- 15×1
- 12×2
- 10×3
For the 15×1, use your 3TRM, for the 12×2 use your 6TRM, and for 10×3 use your 10TRM. TRM, for those not familiar with it, is your technical rep max (see StrongFirst Certified Master Instructor Fabio Zonin’s fantastic article “The 5TRM Back Squat Program” for further details). Your TRM is the rep max you can do while making each rep look exactly the same—no loss in rep speed, no loss in technical soundness, and no loss in quality. If you can do six reps of a given exercise, but the sixth rep looks like a struggle, it’s not your 6TRM. In order to qualify, each rep must look really solid. This may require you to get your ego in check, but you can only train one thing at a time: your body or your ego. Pick one.
As for how to get to your 3, 6, and 10TRM, the method is different for each move:
- For starters, with the pullup and pistol you should simply add weight. Do not complicate things with fancy variations; stick to the tried-and-true standard variations of both for this program and play with more complex variations later. If you cannot get at least ten reps with your bodyweight with both the pistol and pullup, I suggest you work on that before beginning this program.
- For the handstand pushup (HSPU), I recommend manipulating the range of motion. Since most people only ever do them from head to ground on up, they miss out on all the strength benefits there are to be wrought from increasing the range of motion (ROM). An increase in ROM with HSPUs, however, is kind of a tall order. So how do you get stronger through the full range of motion when you’re struggling to add even a little to this movement? Enter the souped-up pike pushup. I started doing these many moons ago to bump up my regular handstand pushups and sure enough, I went from five to nine in a single week’s worth of practice, so these are not to be ignored.
The strength benefits of a farmer’s tan are almost universally underestimated.
The Anytime, Anywhere Bodyweight-Only Strength Program
With many strength programs, you have dedicated hard, medium, and light days. On this program, you will work different moves hard/medium/light each main day. It makes for a surprisingly tough, but effective, program. The layout will look something like this:
Monday:
- HSPU: 15×1
- Pistol: 12×2
- Pullup: 10×3
Wednesday:
- Pistol: 15×1
- Pullup: 12×2
- HSPU: 10×3
Friday:
- Pullup: 15×1
- HSPU: 12×2
- Pistol: 10×3
And on your variety days? Well, they’re perfectly optional. You might find the above is enough to warrant more rest days, and that’s fine. If you’ve still got some energy in the tank on your variety days to do more than stretch, relax, and watch your favorite cat videos on YouTube, I’d recommend the following:
Variety days:
- Hanging leg raise: 1-3 reps x 3-5 sets
- Back bridge progression: submaximal holds
And if you must get some conditioning or power work in, your variety days are the days to do it. In those categories, my vote goes to hill sprints for your power work and crawling, Original Strength-style, for your conditioning. Keep your eyes up and move contralaterally. No plodding along like a pachyderm. And yes, I know, I know, “Crawling’s for babies.” And making passive-aggressive attacks from the safety of your computer is for juveniles, but only one of them will make you stronger, leaner, better conditioned, and a better mover—so take your pick, tough guy.
The Method: How to Progress
The above set and rep demands can be tough the first time around, so look at them as the benchmark, not the requirement. Work your way toward them if you must, but don’t bother going beyond (yet).
One thing each rep scheme has in common is they all revolve around a roughly 30% effort of your max reps in the given TRM. The way you will progress through time is by increasing the percentage effort of your TRM in each set. For example:
Week #1:
Monday:
- HSPU: 15×1
- Pistol: 12×2
- Pullup: 10×3
Wednesday:
- Pistol: 15×1
- Pullup: 12×2
- HSPU: 10×3
Friday:
- Pullup: 15×1
- HSPU: 12×2
- Pistol: 10×3
Week #2:
Monday:
- HSPU: (1, 2) x 5 (3TRM)
- Pistol: (2, 3) x 4 + 2×2 (6TRM)
- Pullup: (3, 4) x 3 + 3×3 (10TRM)
Wednesday:
- Pistol: (1, 2) x 5 (3TRM)
- Pullup: (2, 3) x 4 + 2×2 (6TRM)
- HSPU: (3, 4) x 3 + 3×3 (10TRM)
Friday:
- Pullup: (1, 2) x 5 (3TRM)
- HSPU: (2, 3) x 4 + 2×2 (6TRM)
- Pistol: (3, 4) x 3 + 3×3 (10TRM)
Week #3:
Monday:
- HSPU: 8×2
- Pistol: 8×3
- Pullup: 8×4
Wednesday:
- Pistol: 8×2
- Pullup: 8×3
- HSPU: 8×4
Friday:
- Pullup: 8×2
- HSPU: 8×3
- Pistol: 8×4
Week #4:
Deload—Repeat Week #1
Week #5:
Monday:
- HSPU: 8×2
- Pistol: 8×3
- Pullup: 8×4
Wednesday:
- Pistol: 8×2
- Pullup: 8×3
- HSPU: 8×4
Friday:
- Pullup: 8×2
- HSPU: 8×3
- Pistol: 8×4
Week #6:
Monday:
- HSPU: (2, 3) x 3
- Pistol: (3, 4) x 3 + 1×3
- Pullup: (4, 5) x 3 + 1×3
Wednesday:
- Pistol: (2, 3) x 3
- Pullup: (3, 4) x 3 + 1×3
- HSPU: (4, 5) x 3 + 1×3
Friday:
- Pullup: (2, 3) x 3
- HSPU: (3, 4) x 3 + 1×3
- Pistol: (4, 5) x 3 + 1×3
Week #7
Monday:
- HSPU: 5×3
- Pistol: 6×4
- Pullup: 6×5
Wednesday:
- Pistol: 5×3
- Pullup: 6×4
- HSPU: 6×5
Friday:
- Pullup: 5×3
- HSPU: 6×4
- Pistol: 6×5
Week #8:
Deload—repeat week #5
Week #9:
Here you have two options:
- Retest 3, 6, and 10TRMs of each exercise at your leisure and start the program over or move on to a different program.
- Start adding a set or two per workout and begin increasing the volume. If you keep the added volume somewhat moderate, you can likely maintain the same schedule, but if you aim to increase volume significantly, then you will want to break things up to no more than two moves per workout (ex: pullup and HSPU on one day, pistols the next, etc.). Once you’ve reached a satisfactory amount of added volume (between 7-10 sets), you can then start increasing the density by “racing the clock” to complete your sessions more quickly. Once you can no longer do this, take a few days off and test your maxes.
Never Miss Out on Training Ever Again
After several weeks on a program like this, you’ll likely be pleasantly surprised. This was the program that led me to my first legit full-ROM handstand pushup, not to mention helped me reclaim my weighted pullup and pistol strength that I had lost through time and disuse.
Of course, you can also choose to practice just one of the above techniques and insert it into your existing program following the same rep scheme, or do it on a grease the groove-styled schedule. The choice is yours, but no matter what, you’ll gain a lot of readily applicable brute strength as well as some mental toughness to boot.
As the saying goes, the best laid plans of mice and men often go awry. Life is guaranteed to throw you a curveball and whisk you off of your carefully plotted course when you least expect it. But your path to greater strength and muscularity can stay right on track when you learn to capitalize on one of the greatest and most under-utilized strength training tools in existence: your own fair flesh.
So go ahead: take the road less traveled, get a little lost, and along your way, find your strength—any time, anywhere.
To learn more about bodyweight training, consider the SFB Course or SFB Certification.
You may also like:


He grew up scrawny, unathletic, weak, and goofy until he was exposed to kettlebells and the teaching and methodology of Pavel in his early 20s, and took his training and movement skills to the next level upon discovering Original Strength in his mid-20s.
He is the author of the best-selling book The No BS Kettlebell and Bodyweight Kickstart, as well as The 9-Minute Kettlebell and Bodyweight Challenge—a free guide devoted to helping kettlebell and calisthenics enthusiasts to forge full-body strength, resilience, and real-world fitness in just 9 minutes a day and without giving up their current training program to do so. Check him out online at www.alekssalkin.com.


I’m a little confused with the 3/6/10TRM scheme. Essentially you’re adding intensity to the bodyweight movements, so its not SOLELY a BW program right? Could I forgo the changes in intensity and manipulate volume instead but still use the same structure? Also, how does the TRM work with the HSPU if you’re just adjusting ROM? Thanks…
Would it be possible to start at a lower set count and still gain strength? But continually working my way up to the specified sets??
Sure, Matthew
So 15 sets of 1 rep ? I feel like I’m reading this wrong.
(all listed as sets x reps)
15×1
12×2
10×3
Yes, 15 sets of 1 rep with your 3 technical rep max. 12 sets of 2 reps with your 6 technical rep max, and 10 sets of 3 with your 10 technical rep max.
Hi,
This is a great article, thank you for sharing this with us :).
I was planning to get back into kettlebell training (lately i didn’t have the time to train because of my work, also , i should mention that that i sit 12 hours a day at a desk… so i’m getting out of shape really fast) but i always liked to do some chalestenics.
I was wondering about that, how could i integrate your training plan , or mix it with a kettlebell training. I mean to ask that what do you think should be the limit to kettlebell training/ the movements you mentioned if I do those together and what could we consider a healthy mix that will bring me to my goal.
Currently i am working with a 16 Kg kettlebell but i would like to add your calesthenics training to it.
Thanks, Zoltan! Regarding how to mix the two, I would choose a calisthenics movement or two that you really want to work on and a kettlebell movement or two that you really want to work on. For example:
Cals: Pullups + HSPUs
Kettlebell: Front squats + swings
This would be a great start for a mixed program, and will no doubt net you some great results.
Have fun, and happy training!
Hi,
Thanks for the advice, i will give a try for Pullup+HSPUs and Front squats + swings for some weeks/months and will see how it works for me 😀
Aleks,
just before your article was published I finished the small calisthenics station at my backyard and wanted to start a new program with weighted parallel bar dips and weighted pullups. Before that I did only bodyweight pullups and bodyweight ring dips. I wanted to have three full body sessions a week and I wanted to have some heavy-light periodization. And I considered trying some strongfirst principles. There were so many possibilities and I could not decide what exactly to do. Than I read your article and your program fitted the profile perfectly.
I am on this (slightly modified) program now and yesterday I finished the first week. I do weighted pullups and dips, no handstand pushups and no pistols, because they are to hard for me yet. I have no dip belt and hook kettlebells to my foot.
10RM Pullups = bodyweight, 6RM=8kg, 3RM=12 kg. 10RM dips = bodyweight (I was negatively surprised, because I can do 10 ring dips and I always thought they are harder that bar dips), 6RM = 8 kg, 3RM = 16kg.
Because of time constraints I use the “slow circuit” technique and I add some assistance exercises (legs progression – currently rocking pistols, core – negative HLL, front lever – negative dragon flag and planche progression – frog stand).
Warmup consists of calisthenic skills like handstand, shoulder stand, L-Sit, german hang and skin the cats. After that it’s something like: pullups – 60s rest – rocking pistols – 60s rest – dips – 60s rest – negative dragon flag – 60s rest – pullups… Pistols and dragon flags are done for 3-5 sets and after this sets are finished, HLLs and frog stands replace them. I also did two SS Sessions (16kg getups, 24 for swings) on rest days.
Before this program my program looked more like 3-4×5-10 for horizontal push/pull and 3-4×5-10 for vertical push/pull + assistance. The (extreme?) rep ranges like 15×1 or 10×3 are absolutely new for me, but I like it so far. But nevertheless after this 8 week-program I’ll maybe do a 4-weeks volume/hypertrophy block , for variety’s sake. When I finish the program, I’ll test again and let you know, if and how much I improved.
Thanks!
Hey there Jevgenji,
That’s awesome! I like how you modified it – very smart, and I can definitely see how that would be helpful given your circumstances.
Will you do me a favor and email me at aleks@alekssalkin.com to let me know your results once you’ve finished the program? I’d love to hear all about it!
Thanks!
Great article. I especially like the simplicity of it. You mention conditioning and power work on variety days and you mention sprinting, but would it be a good idea to alternate sprinting with kettlebell swings?
I can’t do handstand push-ups, so I’ll have to work in weighted push-up and pike press variations. Pull-ups I can do about 9 reps and pistol squats about 5-6 reps. thanks.
Thanks, Anthony!
Yes, you can alternate the two. You might be better off doing one or the other, however, so feel free to take your pick. Whatever keeps the program simplest for you is probably your best bet.
If you can’t do handstand pushups, you might also consider dips. And if you can’t do the recommended number of pistols and pullups, you may also try to spend some time bringing them up to the point where you can do 10 in a row of each and then begin the program. In the meantime, you could also take that time to build up your pike pushup and handstand pushup strength so that you have a preparation phase followed by this program.
Hope this helps. Enjoy!
Thanks Aleks,
I’m going to take the simple framework of the program and work towards bringing up my one leg squats and
pull-ups, and utilizing dips, weighted push-ups, and pike presses to work towards handstand push-ups. I won’t
overthink the variety days.
Sounds great! Care to drop me an email at aleks@alekssalkin.com when you go through it all to let me know how it went?
No problem. I’m going to train 3x per week alternating:
one leg squats/weighted squats (w/ vest and/or dumbbell)
push-ups/dips/pike presses
pull-ups/neutral grip chin-ups/inverted rows
Hi – good article, but what does the rep/set scheme in this examples mean?
– HSPU: (1, 2) x 5 (3TRM)
– Pistol: (2, 3) x 4 + 2×2 (6TRM)
– Pull-up: (3, 4) x 3 + 3×3 (10TRM)
Are those parenthesized numbers reps in ladder style.
Thank you! To answer your question, it means as follows.
HSPU: do 1 rep, rest briefly. Do 2 reps, rest longer. Repeat this 5 times. This is to be done with your 3 rep max variation.
Pistol: do 2 reps, rest briefly. Do 3 reps, rest longer. Repeat this 4 times. Once you’ve done that, throw in 2 sets of 2 reps to keep the volume consistent with the week prior. Do this with your 6 rep max variation.
Pullup: Do 3 reps, rest briefly. Do 4 reps, rest longer. Repeat this 3 times. Throw in 3 sets of 3 reps to keep the volume consistent with the week prior. Do this with your 10 rep max variation.
Hope this clears things up. Have fun, and happy training!
Thanks for the article! Super helpful. And thanks for the clarification around the rep/set variations. I’m still unclear what you mean by:
“Do this with your __ rep max variation”
Are you modifying the reps based on your ability (i.e. max) or adding reps to the workout??
Hi, I’m not sure that I got the rep/set schemes on for example this one: (3, 4) x 3 + 1×3. Is this the 3- or respectively 4-rep ladder-style notation?
Alex,
Thanks for the interesting article. Curious about the rest between sets that one should be using?
Thanks.
P.S. Sorry about the name typo, autocorrect…
No worries about the name typo 🙂
Regarding the rest between sets, 90 seconds or more would probably be good to start with. Another option is that you could do these exercises in a “slow circuit” so that you’re pushing the pace, but are essentially getting a rest in for each movement as you move on to the next, i.e. HSPU first, short rest, pistol, short rest, pullup, longer rest. As Pavel says “A change is a form of rest” so you might find that doing your exercises in this fashion is enough of a rest for you.
Could S&S be mixed into this ? Cool stuff:)
You know what, I’ll bet it can. My money would be on going pretty light by S&S standards, though. Drop the bell size and rep count by a bit to make sure you’re not overworking yourself, and add reps/bell size as you see fit. But most importantly, keep the goal the goal and make your main focus the bodyweight program 🙂
Great article !! Could S&S be mixed into this ?
(One personal experience from high volume/short rest one arm pushups) Five or six years back now, I had trained for a while using a “bodyweight Bear” protocol when there were some grumblings about the notion on another forum. That is, the classic get-massive programming from Power To The People!, but the approach was to use difficult calisthenic maneuvers in the place of barbell deadlifts. I was intrigued by this, and my approach was strict one-arm pushups (starting with triples on each side, so six per set) with about 90 seconds rest in between for as many rounds as I could manage with proper form.
I can no longer recall exactly just how far I got with this–at least a few weeks, and my sets eventually entered the mid-teens somewhere, but I discovered that my biggest takeaway from it all was a splitting persistent headache on pressing days.
To concur with Mr. Salkin’s advice, handstand pushups never gave me the same misery while I was Bear-izing them.
Thanks for chiming in! Glad someone else can corroborate my advice 🙂