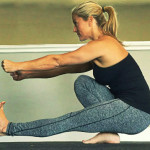
99% of those who have ever seen a perfectly executed pistol (one-legged squat) think of it as of an unattainable feat of strength, if not a circus trick. For us at StrongFirst, though, the pistol is an exercise, a tool we use to reach a certain set of goals.
Sure, those goals can be summed up as “getting stronger.” But if we were to remain true to our concepts — sheer numbers, pounds, and reps wouldn’t cut it. Quality over quantity is what separates smart strength preparation from an ego-fueled race for the YouTube podium.
We know that to get stronger and healthier (rather than paying for strength with our health), we need to acquire the mobility necessary to create the proper joint alignments and the stability to maintain them while developing high forces to move ever heavier loads. The following five tips to get a stronger pistol are based off that simple idea.
1. Get Used to the Pistol Starting Position
By now many of you are familiar with the concept of your brain putting “brakes” on your body when you are forcing it into an unusual position. The formerly inactive proprioceptors fire up and send alarming signals to your brain, pushing it into a “panic” state. The brain reacts by issuing a “Contract!” command to your muscles to prevent the further movement. We feel stiffness and think we lack flexibility.
Pavel’s Relax into Stretch taught us to get rid of that stiffness — not by mindlessly pulling on the contracted muscles, but by consciously relaxing them while progressively going deeper and deeper in the chosen direction (of course, you need to be sure you have no medical condition preventing you from reaching the full range of motion).
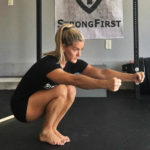
The better you convince your brain the position you are in isn’t dangerous, the better you will be able to assume and maintain it. So, for starters, do not hesitate to use props. Sure enough, before you even consider working on your pistol, you should have a decent goblet squat and preferably, be able to squat below parallel with your feet and knees together — without props!
The idea behind this first tip is to prevent our internal “alarm” from going off by taking away half of our body weight — source of “danger”— and by maintaining the closest control over our position all the while.
You can use a low box, a park bench, or even a chair. Just make sure it’s stable and solid and the surface you’re putting your foot on is level. Let’s say you’re working your left leg and using a box. Put the box on your left side and stand right next to it, feet together. Put your left foot on the box and align it with the box’s edge. Now, begin flexing both knees while keeping you weight evenly distributed between two feet.
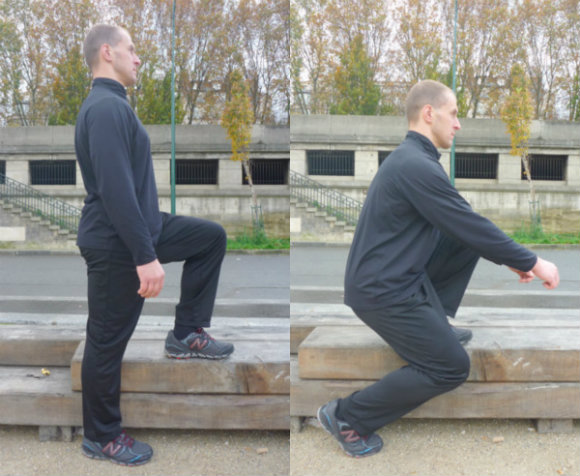
Use diaphragmatic breathing. Your goal is to sit on your left heel. Adjust the position of your right foot so it helps you by taking away the load from the left leg but does not prevent you from going deeper. You do not have to keep your right heel on the ground. At some point you might need to let it rise, especially if the box you’re using is low.
Use Pavel’s technique of “prying” – move your body a little bit forward, backward, and sideways to find a better way down. You may also use a vertical support to hold onto. It will let you stay more upright, allowing more relaxed breathing. Later on, once you’ve achieved your maximal knee flexion, you’ll have to work on increasing the flexion of your ankle and/or your hip in order to be able to hold the position without the prop.
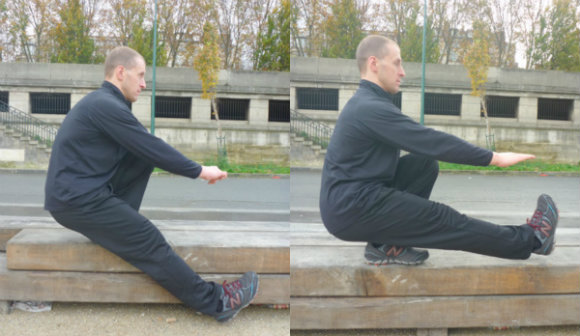
The ultimate step will be to put all your weight on the left foot and slowly slide your right foot forward along the box’s side until your right leg straightens out completely. At this point, you’re ready for the next tip.
2. Get Tight
At my StrongFirst system introductory workshops, I always begin with our most important concepts. Before even getting to “strength is the master quality,” comes the concept of the “body as a unit.”
Our whole body is stronger than any of its separate parts. In order to get stronger, we need to make our whole body participate in each of our movements. Our body parts need to work together as in a military unit where everyone has his or her own role and purpose to accomplish the mission.
From this point of view, each exercise must teach us how to tie together and coordinate our whole body. More precisely, we must let it teach us. The pistol is not different. And the most direct way to do it is to tighten up our muscles in order to “take out the slack.”
Start with yet another of Pavel’s techniques. Assume the same starting position as before and start flexing your knees. A couple of inches short of the full flexion, hold your breath and tighten all your muscles as hard as you can, with the exception of your neck, jaw, and face. If you’re doing it correctly, you will freeze in place like a statue.
Hold your breath and maintain total tension for two or three seconds, and then — release! You will sink deeper. Get up just a little, inhale, and repeat. Chances are, after three or four reps you will sink below your previous “max” depth.
From there, instead of releasing your tension completely, release just a little of your extensor muscles only. While you sink deeper, the feeling you’re looking for is that of a spring being flexed, storing energy for the extension. You can gently bounce at the bottom to feel it even better.
Once you’re familiar with that spring feeling, instead of releasing the tension in the extensors (still in the same setup) try to increase the tension in your flexors. Flex the spring yourself instead of letting the gravity do the work. This way the energy stored in your spring will be even greater.
Now, repeat the last step of the first tip – without releasing the stored tension, shift your body weight onto your left foot and slowly straighten your right leg forward, sliding your right foot along the box’s side. It will probably take you longer than four or five seconds, so breathe behind the shield.
Finally, lift your right leg forward as high as you can, until eventually it is parallel to the floor — without changing your posture, losing your balance, or releasing the tension.
3. Bolt Down Your Foot
It goes without saying that before squatting on one leg, you should be able to stand on it without falling over. In the pistol, your knee has to manage a great amount of force. It needs to be as stable as possible. In order for the knee to be stable, your hip and your ankle must be mobile (as opposed to stiff), while your foot and your lumbar spine must be, again, stable.
If you spend your days sitting and never walk or train barefoot, chances are your feet have lost their sensitivity and with it, their reflexive strength and stability. I won’t go into it here, but you definitely need to recover those before attempting to load your pistols.
As for the exercise, you need to feel the floor all the way through. You need to feel the pressure through the triangle: the heel and the metatarsal joints. You will also need to stiffen your arch so it doesn’t flatten under load.
So, this next tip consists of simply visualizing your foot “bolted” down to the surface of the box even before you start flexing your knees and doing the work described above. At the same time, you need to get rid of unwanted stiffness in your ankle so it can adjust when you’re shifting your body weight without pulling your foot along and compromising your base of support.
To better stiffen the arch, grab the surface of the box with your toes. The contraction of the big toe flexor muscle will also help to stabilize your knee.
One last point, do not transform your pistol into a balancing act. If you begin wobbling, you better settle down, run your visualization again, and start over. The pistol is an exercise, not a circus trick!
4. Push Through Your Heel
To make your pistol “neat,” you’ll have to start and to end the extension at all three of the involved joints (hip, knee, and ankle) at the same time. Not only for aesthetic purposes, but balancing the efforts between the anterior and the posterior chains will help you minimize the shearing forces inside your knee by keeping it centered.
Unfortunately, we often see people starting the ascent of their pistol by pitching forward (ankle flexion), pushing up their rear (knee extension), and only then starting to straighten up (hip and ankle extension). Sure, it’s easier this way. As it is “easier” to round the back in the deadlift and to bend sideways in the press. But we’re not into “easy” for a good reason.
The best way I have found to balance the efforts between the two chains and to make the whole movement as compact as possible is to consciously push the heel down and somewhat behind.
Start in the same position as in Tip #1. Flex the knees and get tight. Keep your weight on both feet. Pry a little back and forth in order to feel (the projection of) your center of gravity moving between your heel and your toes. Finally, find the position where it’s aligned with your lower leg (basically, at the forward edge of your heel).
Now, apply pressure as if you wanted to drive your heel into the surface of the box. Make sure the axis of that pressure is in line with your lower leg and the projection of your center of gravity. Start by rising just a little and progressively extend your range of motion.
I have found that focusing on driving the heel into the surface of the box (and later on, the floor) and on maintaining the alignment with the lower leg also helps with bypassing the sticking point. At the beginning, do not hesitate to start the extension with your left foot on the box and the right on the ground, continuing up on your left leg when the right is completely straight.
When your movement gets fluid, start putting ever larger portion of your body weight onto your left foot, eventually putting your right foot on the ground at the last moment. You can also use a higher box.
5. Drag Your Heel
This is probably the tip that’s most useful for my own pistols. Remember the “brakes” our brain puts on our body when in the panic state? Simple contact with something steady (a post, a wall, the ground) takes away a major part of that “panic.” For instance, letting your right heel slide forward when going down on your left leg, and then to drag it back when going up.
Assume the starting position from the Tip #1. If available, put some rolling or sliding prop under your right heel. All your body weight must be over your left foot. Flex your left knee to eventually sit on your left heel, all the while keeping your right leg straight and sliding your right heel forward. Keep your weight on the left! Pause for a second before returning to the starting position.
When proficient within that setup, switch for a lower box. If you don’t have any, simply extend your ROM like in the previous tip, eventually going up all the way. Finally, try the same drill without the box.
Later on, to close in on the pure pistol, simply start with your right heel off the ground and push the point of contact farther and farther forward. The act of no longer caring about keeping your right leg suspended frees physical and mental energy you can then use to maintain the proper alignments and to make your pistol ever stronger. That way the perfect form, with no contact between your right heel and the ground, comes naturally, almost without effort.
Which Tip Helped Your Pistol the Most?
So, there they are, five simple tips for a stronger pistol. If you find just one of them useful, I’ll be happy and will consider my mission accomplished. And remember – use the pistol as an exercise with a purpose, not a feat!
You may also like:


Only did steps 1 and 2, one time . Nailed my first pistols yesterday!
That’s awesome!
millions of cheers for this article.
Great write up, thanks a lot.
I tried it once and found e great improvement in knee stability. Normaly my right knee would collapse halfway down.
I am hoping this increased mobility will also help in other areas, I experience the same problem in de KB swing.
Thanks again,
René
that’s a great tip Scott. going to definitely try that
CJ
Great tips! My left knee tends to collapse inward about 3/4 of the way into the squat. I accidentally found that improving my Turkish getup technique solved this problem with my pistol.
In the getup, when doing the first push from laying on my back to up on my elbow, I noticed my knee was always collapsing inward. I couldn’t keep it vertical. Then I saw a great Dan John video where he stood next to the student’s bent leg, and had the student “push off” their bent leg from against his leg. So I set myself up in the TGU starting position with my bent leg against a wall. I then did the first push up to my elbow, but drove my bent leg against the wall. Part of my glutes finally figured out they were supposed to be on, and up I went. After just a couple reps, I tried it away from the wall, and it stuck! Perfectly vertical knee throughout.
I practiced this daily for maybe a week, driving my knee outward during the first push to keep it vertical and replicate that new feeling in my glutes. Then unrelatedly I tried a pistol one morning on the top of the stairs. Boom. No more knee collapsing inward. I was stunned, and it took me a minute figure out what was different. It was the tweak of the TGU. Details matter, and I had been doing it slightly wrong for years! As Mark Twain said, it’s the difference between lightning and lightning bug.
Scott
Excellent article. I am in this space now and some of the pointers here will go a long way for me.
Thank you.
I incorporate some ‘shrimp’ squat training, but struggle with pistols – feel it is the hip flexors on the straight leg that trouble me, and the ‘Get tight’ part that you have mentioned in the article.
Do you recommend training the pistols in a GTG fashion?