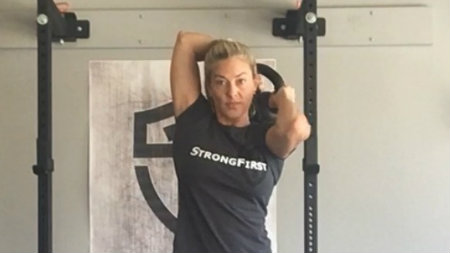
A strength skill that is often underutilized is the hanging leg raise (HLR). Properly performed HLRs build a strong grip, lats, and core, which makes them a tremendous accessory skill for pull-ups. However, in order for you to gain the full benefit from training the HLR, they should be performed with strict form, which requires flexible hamstrings and calves, as well as mobile shoulders and thoracic spine.
Full strict HLRs are best performed for low reps and sets, versus the high-volume ballistic version you may come across in other schools of discipline. The low-rep approach is best due to the neurological drain from the required time under tension to perform a proper HLR.
In my opinion, most people bypass adding the HLR into their training program because of the perceived difficulty, but in this article I will teach you usable progressions to own a strict hanging leg raise.
Step 1: A Proper Warm-up
Prior to performing a HLR or any of its progressions, I recommend you warm up with some or all of the drills in this first video. How much time you spend on each drill will vary depending on which areas you feel are tight or where you are lacking in flexibility.
Watch this video for a detailed explanation of all the warm-ups:
Halo:
- Begin by standing tall with your feet together and your glutes tense while holding a light kettlebell by the horns.
- Slowly make very small circles from your right shoulder, around the back of your head (or neck if you’re extremely mobile), over your left shoulder, and back to your face or chest.
- Perform several repetitions each direction.
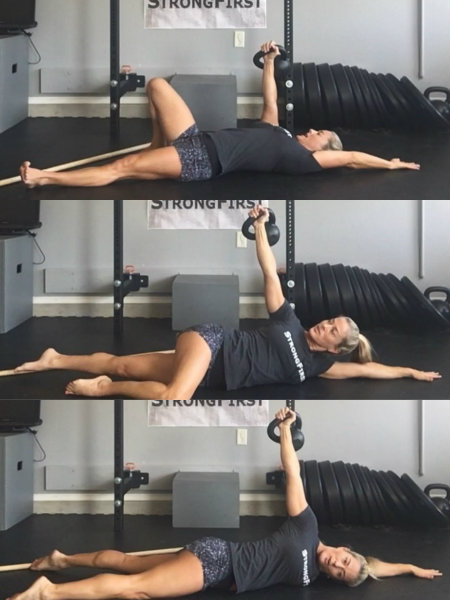
Arm Bar:
- Begin by lying on your back with a light kettlebell by your right side.
- Roll and scoop the bell up with two hands and press overhead while maintaining a packed shoulder. (This is similar to the start of a get-up.)
- Place the opposite arm out straight on the ground above your head.
- Slowly and in a controlled manner, roll your right hip off the floor and across your body while slowly extending the right leg out. Your goal is to maintain the vertical working arm while rolling from your back to your belly, but the distance will depend on your current thoracic and shoulder mobility.
- Slowly roll back to the starting position.
- Repeat for several repetitions on each side. You can complete all on one side then proceed to the other or you can alternate with each repetition.
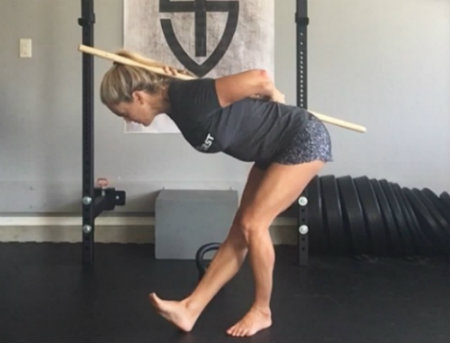
Iron Curtsy:
- Begin by standing tall with your feet together while holding a stick along your spine with one hand behind your neck and the other behind your low back.
- Take a slight step forward with the right foot placing your right heel in line with your left toes This should end up being slightly narrower than shoulder width.
- While maintaining three points of contact with the stick (head, thoracic spine and sacrum) hinge at the hips, keeping the left leg slightly bent, the right leg straight, and the right foot dorsiflexed and slightly turned out.
- Fold in half from the hips toward the right foot without losing contact with the stick. The depth of the fold will depend on your hamstring and calf flexibility.
- Repeat on each side while exhaling as you get deeper in the stretch.
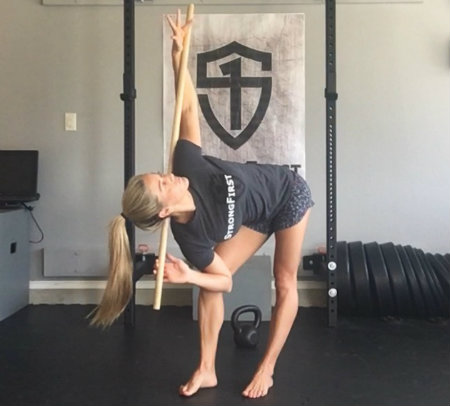
Stick Windmill:
- Begin just as you did for the Iron Curtsy, but this time the stick will be held across your shoulders.
- Begin to send your hips back as you hinge, keeping your weight on the back straight leg and the front leg will be bent and soft.
- Slowly rotate at the thoracic spine, bringing your down elbow toward your knee while your eyes and head turn toward the straight up arm.
- Repeat a few repetitions on each side.
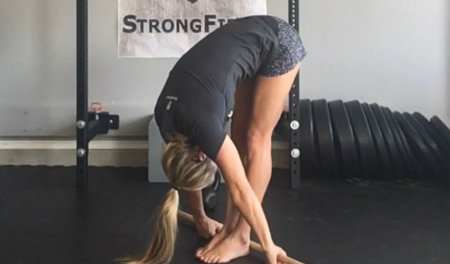
Stick Toe Touch Fold:
- Begin by standing with your feet together while holding a stick with an overhand grip behind your back.
- Hinge at the hips and fold your body toward your legs (to your current flexibility level) while sliding the stick down your legs toward your ankles.
- Hold this position and exhale for several repetitions, trying to gain more depth with each repetition.
Step 2: Set a Baseline
After completing the above mobility work, I recommend setting a baseline for your current strength and flexibility. Setting a baseline prior to training any new movement allows you to know which progression is best for you and in what areas you need to gain flexibility/mobility. If you test your baseline prior to each training session, you identify the amount of mobility work needed before you begin your skill work. This also allows you to track what other areas of your training may be improving or limiting your skill and strength level.
Once you have this knowledge, you can program the proper progressions to correct any spots where you are leaking tension or where you need to improve your strength and flexibility. Once you determine which progression is right for you, it can be done in a grease-the-groove fashion or added into your training program as low reps and sets.
Step 3: Train Your Progression
Progression 1: Hip Ups Partials (on Bar)
- Hang on the bar in hollow with a tactical grip (thumb-less overhand) about shoulder width
- Pack the shoulders and keep them connected for the duration of this drill
- With slightly bent knees raise from the hips
- Point your belly button toward the sky
- Hips should raise slightly then
- Lower and repeat
Progression 2: Leg Raise to L (on Bar)
- Hang on the bar as you did for the Hips Up drill
- Pack the shoulders and keep them connected for the duration of this drill
- Keep your legs straight and fold at the hips raising the feet until you reach the L position
- Lower under control to the hollow hanging position and repeat.
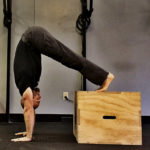
Progression 3: Floor Lowers/Raises (with or without partner)
- Lay on the floor with your arms extended overhead gripping the barbell (or dowel with partner)
- Roll up into a ball with toes on the bar.
- Lower the hips toward the floor while maintaining contact with toes and bar
- Once legs are fully extending and you are folded in half, slowly begin to lower your legs away from bar.
- Maintain core engagement until you reach the lying hollow position.
- Slowly raise straight legs back up until your toes reach the bar and repeat.
Progression 4: Top Downs to L (on Bar)
- Hang on the bar in the hollow position.
- Roll up in a ball with your toes under the bar.
- Drop the hips until the legs become straight.
- Hold this folded position with ankles in contact with the bar for a few seconds.
- With your gaze looking through your legs, slowly lower under control to the L position.
- Rest if needed or roll back up to the starting position and repeat.
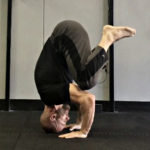
Progress 5: Full Strict Hanging Leg Raise
- Hang on the bar in the hollow position.
- Hands should be about shoulder width with a tactical grip (thumb-less overhand).
- Simultaneously pull down on the bar from your lats as you begin to hinge and raise your legs toward the bar.
- Keep each repetition slow and controlled while keeping your gaze through your legs instead of looking up at the bar.
Note: The end goal in the HLR is not to lean back while bringing the legs up, but rather to fold in half. Leaning back is a compensation for lack of flexibility in most cases, but sometimes it is an error caused by the direction of your gaze. Keep your eyes focused forward through your legs for the duration of the HLR. If you still lean back away from the bar, add additional hamstring stretching into your daily routine.
How to Program These Progressions
Each progression can be used as your current practice for reps and sets until you can perform a solid strict hanging leg raise from hollow to toes-to-bar and back down under complete control. As Chief SFG Brett Jones wrote in a recent article, Spices vs Main Dishes: How to Program a Proper Training Menu, in the beginning you want to assess your mobility and strength level, then select the progression or progressions that will be your current main course until you have corrected any tension loss. (As we say in the SFB Certification, identify any spot of tension leakage and plug those holes to create a linkage to make greater strength gains.) Once you have built the appropriate level of strength to perform solids single strict hanging leg raise reps, then they become your main course and the lead-up progressions become your spice that you add from time to time.
As with all bodyweight skills, once you have one good rep, you can begin greasing the groove a few days a week. Later, you can add HLRs into your training program for low reps and sets. Depending on your goal, the strict HLR might even become your spice while tactical pull ups become the main dish.
You may also like:

Karen currently resides in Dallas where she is available for private and group sessions. She is also available worldwide for distance coaching and program design. She travels regularly instructing workshops and StrongFirst Courses and Certifications.
She can be reached at karensmithmsfg@gmail.com or at her blog, Coach Karen Smith.


This is awesome stuff, thanks!
Karen Smith you rock\m/ thanks for a awesome how to article.
SH
Really great article, love the instructional videos included they really help. I am considering doing the sfb next year and this has given me a little more insight to what I should be working towards
On a lighter note,coach in the final progression you are also leaning backward in place of folding in half 😉
It seems to me it’s almost impossible with this exercise not to lean back to a certain degree. The amount she does looks acceptable to me.
Great read Karen, really enjoying the bodyweight series as it’s where my main interests lie.
I’m currently working on perfecting my L sits but I will get to full range HLRs and this article will help that cause.