Want to forge an iron grip that lasts (which can be one of the quickest ways to improve your deadlift, pull-ups, and snatches)? Improve your press and squat groove? Challenge your midsection? Train pesky and often cranky shoulder stabilizers? Then bottoms-up work could be the movement prescription that your training program needs.
The kettlebell is the most versatile fitness tool ever created. The elegant simplicity of this functional training tool should not be understated. Whether lifting, carrying, swinging, pressing, holding or throwing, the humble kettlebell can do it all. Even using it upside down with the bell between your hand and the sky is an option. Today we will focus on this “bottoms-up” (BU) position.
Whether you don’t have a heavy enough bell to challenge your press, or you wish to work on grip strength endurance, or maybe you are rehabbing a shoulder injury and need to train those small pesky stabilizers, using the kettlebell in the bottoms-up position can address many of these issues.
In this article, I will share a bottoms-up program as well as a few hints, tips, and tricks that I picked up along the way in my own BU self-experimentation.
Before Going Bottoms-Up
Prerequisites:
- You must be comfortable cleaning, pressing, and squatting with one and two kettlebells. If you are new to training with kettlebells, are still finding your pressing groove, or are working on comfort with the single-sided front squat, continue practicing until you reach the SFG I instructor standards.
- Next, you should be able to confidently clean a single kettlebell BU and hold it in the rack for several breaths without acrobatics.
- From your solid BU rack position, you must be able to press the kettlebell for repetitions.
If you are shy on any of these prerequisites, be patient and groove the skills. You, your wrists and shoulders will be happy you did.
It is going to be very important that you find the right size bell for your abilities. There is a fine line between too light and too heavy when it comes to using the kettlebell in the BU position. Take your time and find the “right” bell. Starting with something you can strictly BU press 6-8 times is a good gauge. However, be open to adjusting the bell size—down or up—as you get into the program. There is a little room for “speed wobble” with this program, as long as this doesn’t affect the bell path or your body position. If it does, consider dropping the weight to maintain the integrity of your groove.
Three Tips for a Solid Bottoms-Up Position
As you start to play with the bottoms-up position, there are a few things that will make your life a little easier.
First, ensure that your forearm, wrist, bell handle, and bell all make a straight line. If they don’t, you won’t stand a chance of pressing your bell in a stable and safe position. A good test—either by visualization or trial—is to be sure that you can do a push up on the handle. This will put you in a good starting position.
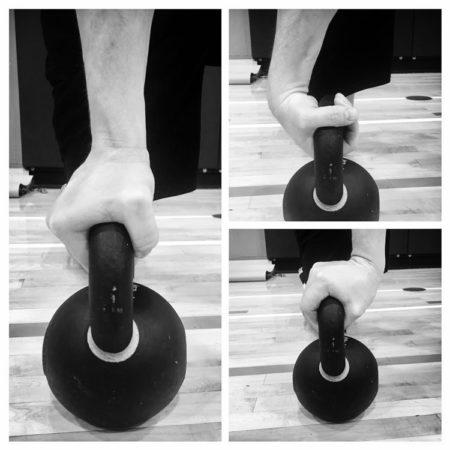
Another trick I’ve found helpful is to move your hand to favor the curve of the handle that is farthest away from you. I’m not saying wrap your hand around the curve, but rather set your hand up so that your thumb is close to the opposite side of the handle to give you a little more control over the bell. As you become more comfortable or desire a greater challenge, you can begin to move your hand closer to the middle of the handle.

The last game changing tip I stumbled across through trial and error was to involve all my fingers as I gripped the handle. The index and middle fingers will grip reflexively, yet you may need to think about engaging your ring and pinky fingers, too. Grip the handle hard with all fingers and you will lock the bell in place.
Bottoms-Up Training Experiment
Now that we know what we need to know, and have practiced, we can move on to the training experiment.
Below is a ladder-style program inspired by the Total Tension Complex, where the volume and density stay consistent with waving intensity. All reps are performed in the bottoms-up position:

Set A: Ladder up Presses
- Set A1: Clean a single kettlebell into the bottoms-up rack position on the right side. Perform one press followed by a squat, swing switch and repeat on the left side.
- Set A2: Swing switch back to the right, do two presses follow by one squat. Swing switch to the left side and repeat.
- Set A3: Swing switch back to the right to finish the set with three presses and one squat. Swing switch and repeat on the left.
- Rest. Once you’ve completed all three sets on both sides, park the bell and shake out the tension in your hands, arms, and body with fast & loose drills. Rest as needed.
- If you cannot complete all reps on both sides without putting the bell down or without maintaining the BU position, consider dropping down a bell size, or trying one of the other “intensity” options below.
Set B: Ladder up Squats
- Set B1-B3: BU clean the bell on the right and complete the same format laddering up the squats instead of the presses.
- Again, if you are unable to maintain a stable BU position for the duration of the set, consider adjusting the intensity.
- Rest.
Final
- With a pair of bells equal to or one size larger than what you just used, perform 5 double BU cleans, holding the top position for 5 seconds.
- Rest as much as needed to ensure quality and reasonable control for two more rounds.
Your weekly training volume will depend on your training schedule. If you are only following this program, three days per week should do the trick to see impressive grip and pattern improvements. I would also suggest mixing in some swings or snatches and get-ups on “off” days. If you are following any other plan, such as a Strong Endurance™conditioning program, you could alternate one week of three days BU and two days conditioning, and the next week switch to two days of BU and three days of conditioning.
Waving the Load
There are a number of ways to build waviness into this program. The easiest is to train with one Medium/Light/Heavy day per week, in that order, using the intensity options found below.
There are some very surprising things that happen when training exclusively in the BU position. Foremost, the amount of feed-forward tension created is shocking. Remember that the medicine or poison of any prescription is in the dose. The overall volume is quite low, allowing you to complete multiple sessions per week. However, the time under tension is quite high, making waving the intensity very important. Keep the bell size manageable and own every rep.
Intensity Options
One of the most interesting aspects of training in the bottoms-up position is the ability to make one bell size more challenging by manipulating the difficulty of gripping the handle. Variables you can manipulate are dryness of hands, style of bell (sport style vs hard style), style of bell handle, eye position relative to the bell, and amount of rest. All of these can create a different experience.
If you train somewhere hot or have hands that sweat, this can seriously challenge your grip, so consider occasionally using chalk for light days. You can spend some extra time drying your hands between sets and even blowing on your hands to help keep them dry.
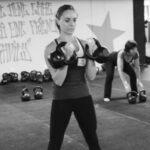
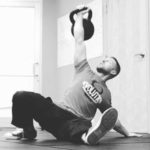
If you’ve never seen a girvoy sport or competition style kettlebell you might be a little surprised by the uniformity of their size across weights. Both the handle thickness and bell diameter are standardized—they don’t increase as the weights do. In contrast, the physical size of hard style kettlebells increases with the weight (the handles may increase but only up to a point). You may, therefore, find it more challenging to hold the bottoms-up position with a 16kg sport style bell than a 16kg hard style bell. If you have access to various styles of kettlebells you can use this to adjust the challenge between your light, medium and heavy days.

both 16kg.
Just as there are different styles of bells, there are also varying styles of kettlebell handles. Sweaty hands may prove to be more challenging with a chrome or glossy handle than with a powder coated one. Manipulating your grip challenge can be a great way to change the “intensity” from one session to the next.
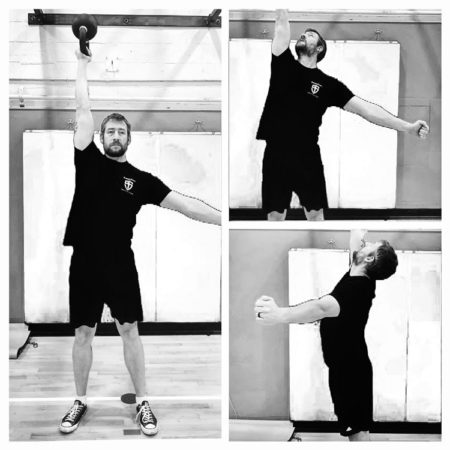
One of the biggest and easiest ways to alter the difficulty of a session—other than altering the load or varying your grip—is to change where you are looking while you have the bell in the BU position. You will undoubtably find it more challenging to take your eyes off the bell than if you keep your gaze fixed on it while pressing, squatting, or cleaning.
Your brain relies on your visual system’s feedback to understand what is going on with your body in relation to the environment. This is called proprioception. To challenge yourself, try this in your next session: clean a bell into the bottoms-up position and look directly at the bell. Next, look at a spot on a wall behind the bell, and then look away. If you want to take it one step farther, close your eyes. You’ll get the idea real quick. Oh and remember, as Pavel says, “Quick feet are happy feet.”
Attention to Detail
The reason it’s important to be fully comfortable with the traditional clean, press, and squat before going BU is that while performing each of these in the bottoms-up position, some funny things can happen to your form and technique. You need to know what ‘good’ feels like before you test it.
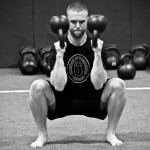
It’s not uncommon to notice a normally adequate squatter all of a sudden laterally weight shift or get some pretty pronounced valgus collapse of the knees (i.e. the knee coming inward) during the BU squat. Feedback from a mirror, camera, or partner can be immensely helpful. Make sure not to rush the reps. Make each one crisp and clean. Stay tight the whole time.
The same can be true with the press. Quite often, you’ll see the bell path change considerably in a BU press as your brain tries to figure out exactly what is happening. In this case, keeping your eyes on the bell as it travels overhead may be helpful (as you would in the get-up). However, please keep in mind that looking up with your head can send your body further into an extension pattern, which is problematic for some. The goal should be to keep the bell path and body position as close to your “normal” press as possible, including your head position. The goal is to press well, not to press at all costs.

The Experiment Results
I followed this program for 6 weeks, tracking a few specific physical aspects while paying attention to other changes. I measured my relative grip strength using a dynamometer. I also tested my press rep max with a 32kg bell. I had been training my snatch quite regularly leading up to the program, so I kept following my Strong Endurance™ protocol during the program.
Grip
After the 6 weeks I retested my hand grip. To my surprise, the dynamometer readings actually went down by 1-2kg on both hands. I had fully expected to see an increase and the fact that I didn’t leads me to believe that I was testing a different “kind” of grip strength than I was training using the bottoms-up position.
I had anticipated an improvement in my relative grip strength because I started the program using a hardstyle 16kg KB with some speed wobble before moving to a sport style 16kg bell (more challenging). I completed the last two weeks of the program using the 20kg hardstyle kettlebell. There was an obvious increase in my dynamic hand grip strength endurance, however it didn’t translate to an increase in maximum relative grip strength as measured by the dynamometer. Oh well.
Press
Before the program, I could press the 32kg bell for three reps with my left arm and could grind out two on my right. After 6 weeks of bottoms-up pressing nothing heavier than a 20kg bell and not snatching anything heavier than a 24kg bell, my 32kg press increased to four reps on the left and a solid three on the right.
I attribute this improvement to the amount of reflexive tension that I had been forced to create during the BU experiment, as well as finding the sweet spot in my pressing groove.
Snatch
I also saw a positive change in both the drive and lockout in my snatch practice. I felt more able to generate power with my hips and adopt a stronger lockout than before the program. I believe that this resulted from the tension that I learned to generate in my standing plank while focusing on the BU position.
Overall I was quite impressed with the results from just 6 weeks of bottoms-up pressing and squatting, even though they were a little different than what I had expected.
Give it a Try
I would encourage anyone who’s become comfortable with the clean, press, and squat to give this BU program a try and to let me know how it goes in the comments below. Just remember to check your ego at the door and use the correct size bell for your ability, rather than struggling with the heaviest weight you think you can handle.
Good luck and happy BU-ing!
You may also like:

When Matt is not working with members of the Canadian Armed Forces or teaching men and women of all ages to get stronger, he is working on honing his craft. You can find him swinging bells, clubs, and maces anywhere it is appropriate and some places it isn’t.
Contact Matt at King Cobra Fit or on the StrongFirst forum.

Hello, unfortunatelly I owe only single KBs… what alternative can I do instead of double KB bu clean at the end of workout ? Can I do it with a single one and then change hands after 5 reps ? Another question is, how about the progress in case my KB sizes are limited ? Can i climb the ladder higher ? Thank you !
Hi I was going to look on YouTube is it bottoms up kettlebell press ? Wanted to see a demonstration.
Thanks
Excellent, thorough article, Matt.
https://www.strongfirst.com/community/threads/tgu-vs-waiters-walk.13647/
For anyone interested, we’ve had a thread going on the forum that discusses bottoms-up work and how it compares to other things, e.g., the getup, the waiter walk, rack carries, and the Cook drill (an overhead carry into a rack carry into a suitcase carry).
I just posted a link to this article, whose timing could not have been more perfect for the forum thread.
https://www.strongfirst.com/community/threads/tgu-vs-waiters-walk.13647/
Nothing like a bit of bottoms-up work to test your alignment…and your grip. Great article Matt.