Headstands are great place to begin your journey to a handstand push-up (HSPU). They allow you to get comfortable upside down while building your balance. Headstands might be the end goal for some or a progression to the HSPU for others. Either way, they build your core and your bent-arm strength while also strengthening your shoulder stabilizers.
As expressed in my other articles, it is great to begin slowly with usable progressions to build a solid foundation of technique before jumping “head first” into the deep end of advanced skills. So let’s take a look at this skill in detail. This article is the first part of a three-part series that will help you plot your journey to the HSPU.
Step 1: Set Up a Solid Base of Support
Let’s first talk about the headstand set-up. There are two options I prefer to use when teaching my students to get into the proper starting position. The first is my favorite, but feel free to use the second option if you do not have a surface that allows you to slide.
Option 1:
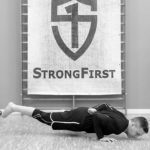
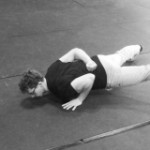
- Start by lying flat on your belly with the top of your feet flat on the ground and your hands on the ground tight beside your chest.
- Tilt your chin toward your chest allowing the top of your head to be placed on the ground. This sets the three-point (tripod) base between your head and hands.
- Press your hands hard into the ground, engage your core, and drag (slide) your feet toward your hands allowing your body to pike.
- As your knees get closer to your body, allow them to bend and place them on your elbows. This puts your body in a stacked tripod position.
Option 2:
- Start on all fours (quadruped) with hands and knees about shoulder width apart.
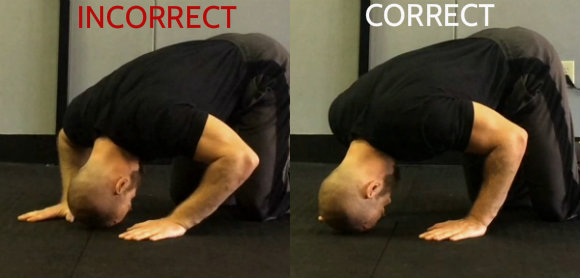
- Bend and place the top front of your head (just past your forehead to maintain neutral cervical spine) on the ground to form the third position of your tripod base along with your palms.
- Lift your hips toward the ceiling and, if your flexibility allows, place one knee on each elbow.
Tips for Success
No matter which of the above options you select to get into the proper set-up, the following points will apply:
- Use shoulder-width hand placement for better balance.
- Use the proper head distance to form the third point of your tripod.
- Equally distribute pressure between all the points of your tripod (head, right hand, left hand).
- Do not hold your breath, but take shallow breaths.
- Your eyes should be looking one to two feet in front of you on the ground.
- If you fear being upside down and rolling over, have your back facing a wall so you cannot fall or roll over.
Remember to think of forming the triangle base of support for better balance. I have found that most people start with the head in too close to the hands and the hands too wide. Having the head in too close would form more of a straight line, as if you were trying to set-up on a balance beam, which we all know would be very difficult for most of us!
Step 2: Progressing from Base of Support to Movement
Once you can achieve the set-up position with your pressure evenly distributed between all three points and you can balance with your knees resting on your elbows, this position becomes your first progression. As you build up the time you can hold this position, not only will you improve your balance, but you will also be increasing your bent-arm stabilizing strength.
The second progression is to maintain this hold while slowing extending one leg into the overhead position. Hold for time and then switch to other side and repeat.
The third progression is to maintain this hold while slowing extending both legs simultaneously from the bent-knee balance into the hollow body position and balance. You will need to find the optimal amount of core tension to maintain your balance and not fall over.
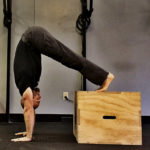
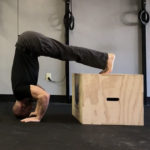
The fourth progression will allow you to start moving while also maintaining your balance. You can select to do pike or straddle lowers and raises. Slow controlled lowers will strengthen your core while also building your shoulder stabilizers and increasing your balance during transitions.
The fifth and final progression in part one of Your Journey to the HSPU is the begin progressions to an upright headstand. Once you have practice holding a hollow body headstand, you would begin to straighten out your body into a strict overhead straight headstand.
Begin Your Handstand Push-up Journey
The headstand is a great place for most anyone to begin getting comfortable being upside down, as well as to practice applying pressure to the head while also learning to distribute the pressure between their hands.
Patient practice is important with the headstand and HSPU progressions, just as it is with most bodyweight strength skills. Start by setting a solid foundation with your bent-arm practice, and when I return with part two of this series, you will advance quicker in your straight arm stabilizing strength training.
For more, read:
You may also like:
Karen currently resides in Dallas where she is available for private and group sessions. She is also available worldwide for distance coaching and program design. She travels regularly instructing workshops and StrongFirst Courses and Certifications.
She can be reached at karensmithmsfg@gmail.com or at her blog, Coach Karen Smith.


Since about half of your weight is going through your hands, the body would naturally have to be angled somewhat to the floor (it could only be fully vertical if all weight was on the head). So progression 5 seems unnecessary to me. The only way to get the feet over the head is to arch your lower back somewhat. Why is this preferred over the hollow-body position (which is advantageous to learn for future HS work anyways)? I was under the impression Headstands should always be done hollow, with a straight line from head to toes, and that line would naturally angle downwards due to my reasons above. Just some thoughts.
That’s obviously nitpicking. The rest of the article is awesome and I’m looking forward for the next parts. Progression 4 is especially difficult (much harder than any other) and an incredibly worthwhile active flexibility and posterior chain exercise. It’s the first step towards Handstand Pressing, which is an absurdly difficult but worthwhile skill! Good stuff Coach.
Q What is the best way to practice and handle falling over behind you if you go too far?
A1 Learn how to breakfall as in the martial arts technques and practice them well before you do handstands, in the meantinme
A2 practice with a wall a couple of feet behind you as a back stop.
OB
A3 also practice on a relative soft surface to cushion any unanticipated movement culminating with soft surface ground contact.
These 3 will help prevent injury which will help training progress.
OB
All great options, if you have a training partner you could also have them spot you until comfortable. But when that is not an option, I would either us the wall or a soft surface to tuck and roll.
Love your articles Karen.
Gonna try this somewhere I can’t break anything.
Karen, great article as always! Question: What is the best way to practice and handle falling over behind you if you go too far? I am not sure whether to try to tuck and roll, or keep my body straight and bend my legs and try to catch myself with the feet.
Definitely tuck and roll. Although if you follow the instructions, it should happen pretty much never. The Headstand is a very stable position. Unlike the Handstand, bailing back is rarely needed. But once in a blue moon, you might need it and tucking into a little ball is very comfortable to be frank.
Very nicely done and thorough demonstration through video series. Thanks 🙂