Remember when you were a kid and your parents always told you to brush your teeth?
Well, like a lot of kids you might have let it “go in one ear and out the other” and either forgot or just plain refused to do it. Then one day you might have had a regular check-up at the dentist or got a toothache and needed to see one.
The dentist might have found a cavity in one or more of your teeth that needed to be drilled and then filled. This being the consequence of not brushing your teeth.
The same thing goes for keeping your calluses in check to avoid developing an underlying blister and tearing your hands.
Have you ever been told by your coach to take care of your hands?
A callus (plural: calluses) is an area of thickened and sometimes hardened skin that forms as a response to repeated friction, pressure, or other irritation.1
When working with kettlebells, barbells, and pullup bars, we expose the skin of our hands to an environment that many folks take for granted.
Take a moment to think about the following example of what the hands of a student of strength might experience on a weekly basis.
The back-and-forth rotation of a steel kettlebell handle across the skin of your palms with constant changes of pressure combined with the addition of chalk and sweat, hundreds of times per week.
Then add hanging onto a rough knurled barbell that is trying to tear the skin from your palms while doing deadlifts.
Top it off with hanging from a pullup bar that rotates across the palm and fingers, again covered with chalk that pulls every ounce of moisture from your skin cells.
This is all just a normal week for my hands and only covers a small portion of “training” not to mention the normal day-to-day “work” we all put our hands through.
Added all together, these weeks multiply into months then years. This is some serious work and without a good hand care plan that can be implemented on a regular basis and sustained over the years our hands are doomed to inevitable callus buildup, blisters, and skin tears.
I say this from experience because I have been training with the barbell for forty-three years, the pullup bar for forty years, and the kettlebell for twenty-two years. I am a craftsman by trade and the daily exposure to dirt, hot, cold, sharp, and rough objects along with chemical substances have taken a toll on my hands over the course of several decades.
With this article I would like to introduce you to my method of hand care and maintenance.
I wish not only to show “how” I do it but also to show you with “what” I do it.
A bit of history about my hand care method and how it came about to be what it is today.
For many years, decades even, I relied mostly on my sharp pocketknives to trim the built-up calluses from my hands. The use of hand cream to moisturize my dry skin was nearly non-existent.
My hands and fingers would crack and split, and I often had a ripped callus and/or open wound on my hands. Training and working with tools became a painful chore, and I began spending much of my free time tending to and mending my hands.
I then started playing around with different grits of sandpaper, i.e., 80,100, 120, 160, and sanded the calluses on my hands on a daily basis while at work. I started noticing a reduction of callus build-up and my skin was not as dry as it had been.
Almost by accident I realized that I could remove more skin from my hands when they were damp than when completely dry. I found that 120 grit coarseness provided the best balance between removing skin and sanding (smoothing) and began using sanding belts from a belt sander rather than normal sandpaper. Sanding belts are made of a fibrous material that does not soften and break down when wet, like the paper base of normal sandpaper would.
To be able to exert some force with my free hand and make the action of sanding easier, I stapled a piece of a sanding belt to a short piece of a wooden broom handle.
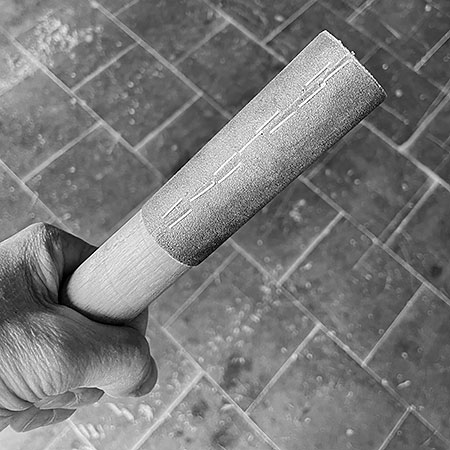
This primitive contraption worked surprisingly well, and I noticed that the circumference of the belt wrapped around the handle was close to that of a barbell, kettlebell handle, and even a pullup bar.
I eventually started having issues with the staples coming loose from the handle due to the wood becoming wet and then dry, so I refined the construction of this primitive hand sander with materials that would not be affected by the exposure to water and constant use.
After constructing the handle with a PVC pipe and gluing the sanding belt to it with a strong waterproof adhesive, I believed to have found the right materials for the job.
Now that I have explained “what” this article is actually about, I will explain how to use this tool.
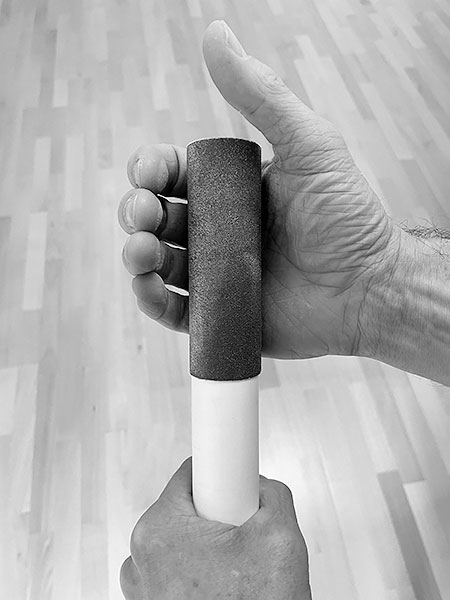
First wash your hands thoroughly with soap and warm water. Keep rinsing your hands in very warm water (not too hot) for just a few minutes.
Place the hand sander in the water running from the faucet to get it wet. Turn off the water and use a hand towel to slightly dry off your hands and sander, but only slightly, leave them somewhat damp.
Take the hand sander in one hand and then close your other hand around the sandpaper covered end and begin rotating the sander in your hand. The rotation is about the same as a kettlebell handle or pullup bar would rotate in your palm.
Keep rotating and soon you will notice the friction caused by the movement and the rough sandpaper will begin sanding off dead and built-up skin from your palms.
You can then begin sanding back and forth in combination with rotation to remove excess skin directly from your calluses.
When no further skin can be sanded off, simply rinse off the sander and repeat the process with your other hand.
If this explanation was not completely clear the following video should help with any open questions.
What do you do if your callused hands get to the point beyond what the hand sander is capable of managing?
Being a tradesman at heart, I also wish to go beyond the scope of a “normal” article and share the following video tutorial that shows how with a bit of ingenuity, a few hand tools and a short material list that can be easily obtained from family or friends and/or a hardware store, you will have all you need to build one of these devices yourself.
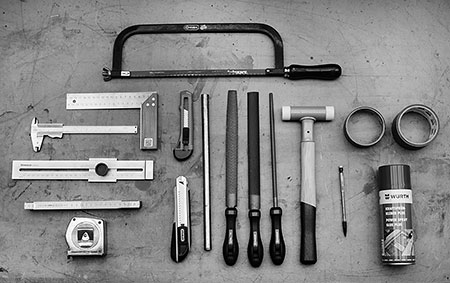
A list of tools needed to construct a hand sander:
- Hacksaw
- Square
- Ruler/tape measure
- Box Cutter
- Steel rod/pipe
- Rasp
- Medium file
- Nylon faced hammer
- Pencil
- Painters tape
- Spray adhesive
- Bench vice
Now that you have the “what,” “why,” and the “how,” make a habit of caring for your hands on a regular basis. Managing your calluses should be included in your rest, refueling, and recovery from training.
Taking care of your hands = taking care of yourself.
Stay focused and train smart.
Note: The author has no affiliation with the products depicted in this article nor does he manufacture or sell hand sanders.
References
1 https://en.wikipedia.org/wiki/Callus
You may also like:


He specializes in mountain adventure training and strength training for triathletes with a philosophy that incorporates elements of Plan Strong™, Built Strong, and Strong Endurance™. He shares his knowledge by teaching the All-Terrain Conditioning™ seminar and offers in-person training for small groups and individuals, as well as online training in both English and German.

I love this helpful article and tutorial, maybe this is ALSO the answer to the nonstop attention my feet require. Thank you so much!
Nice article, Kenneth. I also discovered 120 grit to be the perfect sandpaper. I use a sanding disk, which has some backing to it and I can roll and apply to palms and fingers in a variety of ways to knock the skin down as needed.
Great article about hand care! For those who don’t want to build their own hand-sanding device – there is a company called Sandbar Hand Care:(https://sandbarcalluscare.com/). I have no affiliation with the company, but I’ve used their products on my hands for years, and it appears to be similar to what you’re sharing.