“We shape our tools and afterwards our tools shape us.” —Marshall McLuhan
Our “tools” could be looked at as our implement (a kettlebell, for example), the exercise we select, our program, or how we use the tool to mold us. Multipurpose tools have become a mainstay in our lives. We “shaped” the multipurpose tool to allow us to be able to handle more jobs in a compact “one stop shop” form. And the multipurpose tool has certainly shaped us. We expect one thing to do…well…everything (can you say smartphone?).
But don’t think this is a new trend. Oh no. Apparently, the Romans created the first known multipurpose tool about 1,800 years ago. Rediscovery is still a form of discovery, but…
I digress…
Perhaps one of the best multipurpose tools in the kettlebell repertoire is the get-up. “It slices, it dices, it juliennes…” as the old infomercial goes. The get-up builds many physical qualities as it teaches you how to efficiently align yourself under load.
A version of the get-up that is sometimes discussed is the addition of a press at each step. And like the eighteen hundred year old Roman multitool, such a variation is not new. I certainly did not invent it. In fact, I remember seeing Paul Daniels, Senior SFG, performing this well over a decade ago.
Get-up with Presses
For now, we will focus on the get-up with a press at each step. (I mean I don’t want to give it all away in one article, but…) Pressing at each stage creates unique angles and positions that help you build strength and control through almost every conceivable shoulder range of motion.
Quick Note—During these presses (and any presses, really), you will be performing an “active negative,” where you actively pull the kettlebell down to the various rack positions. Do not just yield to gravity or “drop” the kettlebell down, but use your strength (and lats) to pull the kettlebell to the rack position.
Where are the Presses?
At the beginning (after performing your roll to press), perform a floor press. This is just like a dumbbell floor press/bench press, but the off-center load adds a unique challenge.
At the elbow, you pull the kettlebell down, “spiraling in” to the elbow strike position without going out to the side, which can load the shoulder too much across the anterior-superior aspects. This incline press can be very shoulder-friendly when done correctly and under control.
At the hand or tall-sit position, you again pull the kettlebell down and spiral inside the bent/up leg. This higher incline press position is not quite fully overhead, but close.
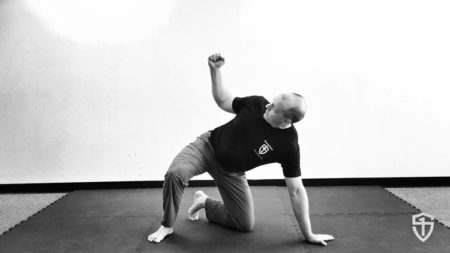 At the half-kneeling windmill stage after sweeping the leg, you have the option to pull the kettlebell down into a unique “side press” position. This isn’t for everyone and it’s up to you to add or delete it based on your shoulder health and history. If you want to build towards or improve your bent press, then the press at this position can be very helpful. Familiarity with the bent-armbar can be a good way to improve your shoulder position for this particular press. The video below will show get-up variations with and without this “side press.”
At half-kneeling, perform another press. Now you’re fully upright and pressing overhead but on an asymmetrical base, which makes this press a good check of contralateral stability.
At the standing position, perform a standard kettlebell military press.
Then you can reverse the get-up without the presses. After all, you’ve performed five presses and will have doubled the amount of time it typically takes you to get to the standing position.
Key Points for Pressing During your Get-up:
- Not every press is for every person. You must forego the presses that are not right for you.
- Go lighter than you think you need to when trying this get-up variation.
- DO NOT go to failure or even fatigue. There is a long time under tension in this exercise so you might be surprised by how quickly your shoulder(s) tire.
- See an SFG instructor for assistance in this and other get-up variations.
Check out this Get-up Video for Demonstrations
How do you Program this “Tool”?
Option 1 – The “short on time” training solution
On a day where you are short on time, perform 3-5 get-ups with presses after your normal movement prep work.
One rep right—rest—one rep left—rest etc…
You will perform between 15-25 presses on each arm if using the press at the windmill (and 12-20 if not), and 3-5 get-ups on each side. This is the best option when you are short on time.
Option 2 – Military press preparation
On a day where your main lift will be the military press (kettlebell or barbell), perform 1-2 get-ups with presses after your normal movement prep.
This will fully “warm-up” and prepare the shoulders for the upcoming strength work.
Option 3 – Just add one
On a normal training day when you might be performing 3-5 get-ups, simply make one of these a get-up with presses.
Give this get-up variation a try, be mindful of the key points laid out above, and keep us posted on your progress on the StrongFirst forum.
You may also like:


With over twenty years of experience, Brett has been sought out to consult with professional teams and athletes, as well as present throughout the United States and internationally.
As an athletic trainer who has transitioned into the fitness industry, Brett has taught kettlebell techniques and principles since 2003. He has taught for Functional Movement Systems (FMS) since 2006, and has created multiple DVDs and manuals with world-renowned physical therapist Gray Cook, including the widely-praised “Secrets of…” series.
Brett continues to evolve his approach to training and teaching, and is passionate about improving the quality of education for the fitness industry. He is available for consultations and distance coaching—e-mail him for more info.
Brett is the author of Iron Cardio.
Follow him on Twitter at @BrettEJones.


Wonderful-I’d forgotten about this version of the TGU-great also for grapplers
Awesome ! Will try this some day.
EXCELLENT! I love this! Right on!!!
Thank you
Am I mis-counting? You mention that there are 5 presses if one does the windmill option, but I count 6: floor press, elbow, tall-sit, windmill, lunge, standing. Or is that one floor press and five presses (since OH presses were once called just presses)?
Matt
I was subconsciously considering the Floor Press as a repeat of the Roll to Press of the start of the Get-up and counting the “overhead” presses.
5 or 6 depending on perspective
Great article thank you. Our students are well versed in the pressing get up. They do it every Friday night on
TGU day. 🙂
Excellent
“Go lighter than you think you need to when trying this get-up variation.”
This is 100% true!
I recently tried doing the get-up with presses using a 24kg kettlebell before reading this article and when I reached the point of doing the side press, I regretted not using a lighter bell. I can strict press a 24kg 12-15 times with each arm, so I figured it was light enough to use during my get-up presses… WRONG. I’ll be using my 16kg next time.
Thanks Brett for the article and video demonstration. I always benefit from your training material.
Thank you Leonardo
Good article! I never thought of a get-up with press session as an ultra-minimalist strength session, but it really is. I used option 2 as my warm-up for Rite of Passage ladders and it was perfect.
Excellent