Brett Jones, StrongFirst Director of Education, has a saying, “I can be talked into just about anything.” Brett is referring to your individual context for doing something—the reason WHY you choose to do what you are doing. The same question can be applied to your barbell front squat training: Why are you doing front squats? Are you an athletTraditional e that will be training with barbell cleans, push presses, or jerks? Are you doing front squats to develop your upper back, quad strength, or size? Do you want to improve your mobility?
At the SFL StrongFirst Barbell Instructor Certification we teach three different styles of front rack grip:
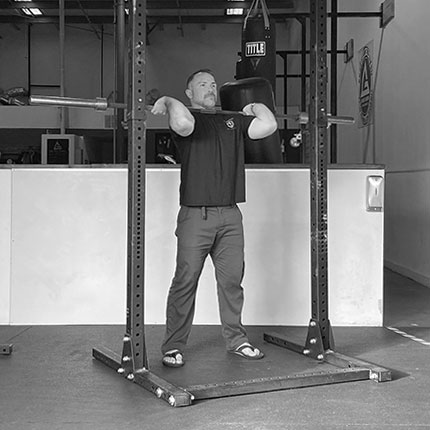
Traditional (Olympic-style)
- Full grip on the bar
- Humerus is externally rotated and flexed 90 degrees off the chest
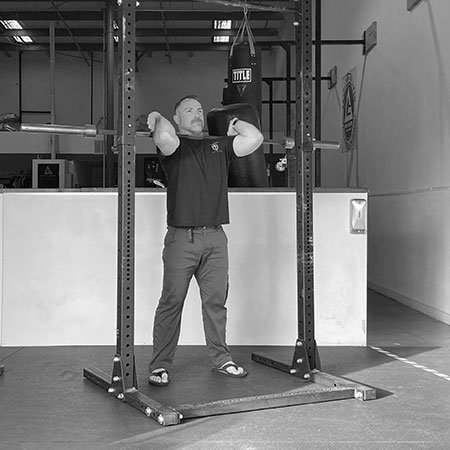
Weightlifting with straps (Powerlifting-style)
- Neutral wrist grip on straps looped onto barbell
- Humerus slightly externally rotated and flexed 90 degrees off the chest
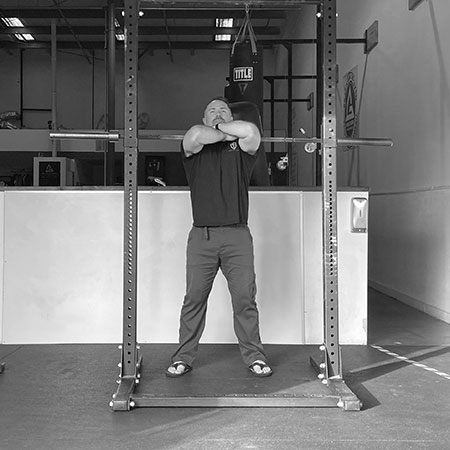
Bodybuilding-style
- No grip on the bar, hands loosely set on top of the bar
- Humerus is internally rotated and flexed 90 degrees off the chest
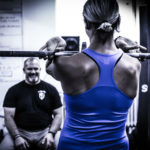
A strong front squat is a necessity for athletes training to improve strength and performance, making the traditional front rack an ideal choice. Lifters with non-performance-based goals may prefer weightlifting with straps or the bodybuilding style (although I will do my best to steer you away from this last option). When considering which front rack to choose, your current mobility can be a determining factor in choosing your ideal front squat. In this article, we will discuss the three front rack styles and then focus on mobility training for the traditional front rack. This style, although the strongest, is the hardest to achieve. Simply knowing the difference between these front rack positions is not enough if mobility limits your choice.
Stability and Control
When comparing front squat styles, it is important to understand that stability and control of the bar are largely influenced by the rack position you choose. This is due to the large role the lat plays in creating a strong front rack position. The lat is a powerful internal rotator of the shoulder (as well as an extensor and adductor), which gives it the ability to create torque, lock the barbell onto the shoulders, and stabilize the upper and lower back. Its insertion points on the ribs and lumbar fascia add to this as well. When the humerus is externally rotated the lat is pulled tight. This secures the ball and socket of the shoulder joint and stabilizes the area of the spine and ribs creating stability through tension. Tension is then intensified by increasing the height of the elbows up (shoulder flexion) and out for a good front rack position. This external shoulder rotation with flexion is also what causes chin-ups to be easier than pullups when starting out. Tension equals strength.
The traditional front rack position with hands securely gripping the barbell, humerus externally rotated, and elbows high and out, creates the most tension resulting in strength and stability. The powerlifting style uses weightlifting straps connected to the barbell also forcing some external rotation on the humerus while maintaining a neutral (straight) wrist position. Making it a great option for the general population. The bodybuilding front rack with the internally rotated humerus and draped hand grip across the top of the bar is the least stable. Without a strong grip on the bar, it is difficult to create lat torque and the tension that comes from an externally rotated humerus. New lifters often select this grip because they rarely have the lat mobility required for the traditional front rack grip and are unfamiliar with the powerlifting front rack.
Limited Mobility
Front squats require tremendous mobility from the lats, T-spine, hips, and ankles. A limitation in one area causes increasing demands on all the others. Most newbies to the traditional front squat complain of wrist pain. That issue usually occurs when the joint becomes overloaded and limited ankle mobility starts pushing the hips into a hinge and not down into a squat. This forces the torso to tilt forward causing the barbell to start rolling forward off the shoulders and driving into the wrists. Not good. Lack of hip mobility can cause a similar effect. Although there are several other factors that make the traditional front rack grip difficult, thoracic spine mobility and inadequate lat mobility are typically the main culprits.
Mobility Guide for a Strong Traditonal Front Rack
The four areas where front squat mobility is critical are ankles, hips, T-spine, and lats.
Ankles
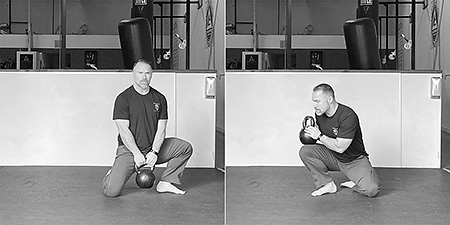
For ankle mobility, perform SMFR (Self-Myofascial Release with a foam roller) on the calves, followed by kettlebell-loaded, half kneeling ankle mobilizations.
From a kneeling position, with the lead leg abducted out 90 degrees, hold a kettlebell at arm’s length in front of the body and rock forward towards the lead leg, driving the knee out past the toes, keeping the heel down. Don’t allow the knee to dip in, keeping hips and torso tall.
Another suitable option for increasing ankle mobility, are prying goblet squats.
Hips
To increase hip mobility, SMFR any tight and painful areas, followed by a 90/90 seated stretch, prying goblet squats, and hip flexor couch stretch.
T-Spine
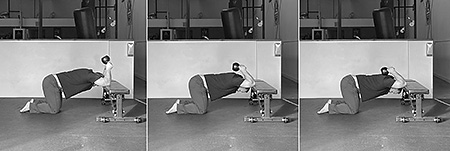
Foam roller thoracic flexion-extension drill is one of the best ways to mobilize the T-spine using your breath and the foam roller. Kettlebell bench prayer stretch is a valuable drill developed by StrongFirst Certified Master Instructor, Pavel Macek in his course StrongFirst RESILIENT. The kettlebell bench prayer stretch utilizes a light load to assist the stretch. Relax and breathe into the stretch or perform PNF (Proprioceptive Neuromuscular Facilitation) contract-relax, by pushing the elbows into the bench to contract the lat muscle followed by a relaxation and exhale. Kettlebell arm bars and halos can be beneficial as well.
Lats
Pairing lat stretches with SMFR is effective, as well as performing Pavel Macek’s bench prayer stretch drill with the hips tucked and low back in flexion. This drill will provide a stretch that mirrors the front rack position.

Front Rack-Specific Mobility Drills
A specific front rack mobility stretch used by many weightlifters using the traditional front rack, places the barbell on the upper traps like when performing a high bar back squat, then gripping the bar with the hands as if performing a front squat and driving the elbows up towards the ceiling. Working one side at a time, pry the shoulder by lifting the elbow up as high as possible. Each time, trying to lift the elbow a little bit higher. Although the grip will loosen to allow the barbell to rotate in the opposite hand, work to keep the barbell in the palm and not allow it to roll into the open hand or fingertips. Weightlifting wrist straps can be beneficial here as they will force the hand to stay on the barbell. If this drill is too challenging, you can do a similar version by holding the barbell in a front rack position, while still driving the elbows up toward the ceiling and lifting them as high as possible. Do this version first, if necessary, and then progress to the more advanced one. Both drills are shown in the videos below.
One last drill utilizes a PNF stretch in the front rack position. This stretch can be done with a partner (the partner’s shoulders will act as a squat rack/second barbell) or solo holding one barbell in the front rack position with a second in the rack. Place the racked barbell at your standard front squat height (slightly below the shoulders so when you un-rack the barbell it is still in the J-hook frame but will clear the J-hook without having to tip-toe out). Set up in a front rack position with the other barbell. Perform a slight quarter squat to drop the torso and elevate the elbows on the second barbell until a stretch position is found. Passively hold this stretch position for thirty seconds to a minute. Then start to push down into the rack with your elbows for ten seconds. Upon completion of pushing into the barbell exhale and sink deeper into a squat position, elevating your elbows higher. Perform this contract-relax action two to three more times.
Final Thoughts
In most circumstances, the front squat is the better option for barbell squatting because of increased ranges of motion and depth, upper back strength, and how it loads the abdominals. It is important to understand the different styles and choose the right one for your goals. Choosing a bodybuilding style will not challenge your mobility, but it will be the least stable position. A powerlifting style front rack is a more stable option but does not create as much tension as the traditional front rack. It is, however, a good choice for the general population. Overall, choose the front rack style that most fits your goal but don’t let your mobility make the choice for you. Be patient, do these drills, and as your mobility increases you will be able to achieve a powerful and explosive traditional front squat—if you so choose.
You may also like:


The image of the powerlifting grip does not seem to match the description nor my traditional understanding of how it works. It look like you are using a standard olympic grip but with straps. I understand it as slip-looping the straps around the bar (as opposed to putting the loop around your wrist like how you would typically use straps), then you grip the strap ends (in a neutral grip as you mention) – usually right at the bar. Therefore you are only holding the strap, not the bar. Considering this is the recommended grip for most people, it might be helpful to better illustrate how its done.
Hi Kyle,
That is an accurate observation. We accidentally inserted the wrong picture. It is corrected now. Thanks for noticing that and providing feedback.