Why the Barbell?
At some point every person who trains for strength should learn to use a barbell. When it comes to heavy lifting, the barbell reigns supreme. Two hands on a knurled bar with a balanced load; it doesn’t get any better than that when it comes to getting strong.
There are also many programming options with barbell training, being that you can make it as heavy (or as light) as you want in as little as one to five-pound weight increments. Nowhere else can you get such versatility in loading, allowing for more accurate percentage-based programs.
Besides the max strength advantages that a barbell provides, the “Iron Game” was built on the barbell with powerlifting and weightlifting leading the way. The barbell quite literally the tool of the trade.
Why the Deadlift?
Whether or not a person chooses to make barbell training their primary modality is up to them. There are plenty of reasons why someone would use a different implement, but I cannot think of any reason why a person wouldn’t at least learn a few basic lifts. And the deadlift is the most basic of all lifts. The first thing you would do (provided the bar isn’t already resting on a rack) is pick it up off of the ground. That’s a deadlift. It’s also the easiest to learn and arguably the most useful.
The way I look at it is, I’m going to “deadlift” every day. It might be to just pick up a pencil I dropped on the floor, or it might be something a little heavier like a sleeping kid or a big bag of animal feed. Either way, at some time today I’m going to bend over and pick something up. Most likely I’ll do it many times over.
Deadlifting in the gym will carry over to everything that you will pick up outside of the gym, and it also allows you to test the strength you’ve built with your kettlebell.
Start with the Kettlebell
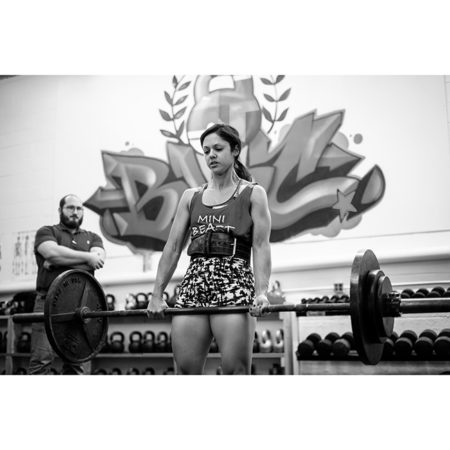
I start all my students off with a kettlebell. It doesn’t matter if they are here for our Strength & Conditioning classes or Strongman Saturday, everybody warms up by practicing the hinge with a kettlebell. First is the kettlebell deadlift, and then the swing.
Although not necessary, becoming proficient in the kettlebell swing is highly recommended before moving onto the barbell deadlift. Not only does it allow you to solidify the movement pattern of the hinge, but you can build some serious strength through swinging. I’ve seen many men pull 300lb deadlifts, and women 200lb deadlifts, their very first time touching a barbell; and it was because they had done thousands of swings.
Of course, StrongFirst readers should know there is only a certain kind of swing that will build strength like that—the “hardstyle” swing, preferably heavy and with two hands!
Back to the deadlift…
As I said, everybody starts with the kettlebell deadlift. First, it’s easier to learn because you can get the weight right in between your feet/legs which is closer to your center of gravity. This allows for better body mechanics. Second, anything heavier than a 16kg kettlebell will set the handle at a height higher than your standard bar height (9”), which will also be to the lifter’s advantage. The point here is simply to move through the hinge pattern with a load. The exact positioning of the weight is not our primary concern; the positioning of the body is.
The kettlebell deadlift also gives an opportunity to teach principles of tension like breathing and bracing before the trainee actually needs it when the load is higher. Unless you have an aluminum training bar and 5lb training plates, most facilities aren’t equipped to allow for deadlifts to be performed (at the proper height) with less than 65lbs, which is more than you would want kids, seniors, or very deconditioned people to start with.
The Wall Hinge Builds the Base Movement
Occasionally there will be people who have difficulty learning to deadlift with even a kettlebell. Usually it’s because they are doing something that resembles either 1) a squat (excess knee flexion) 2) a stiff leg deadlift (not enough knee flexion), or 3) a round back deadlift. The “wall hinge” will correct those things 90% of the time.
To perform the wall hinge have the trainee stand with their back facing the wall, about 12” away. Instruct them to push their hips back until the glutes touch the wall and then return to the standing position. Inch forward and repeat. Continue to inch them forward until they can no longer touch the wall. The goal here is to get as far away from the wall as possible, while still being able to touch the wall. The maximum possible distance from the wall would be equal to the length of the femur, although it’s not necessary to achieve that to get the benefit of this drill.
Some things to note:
- They should not “lean” into the wall. Simply tap and come back.
- If their knees travel forward it will limit how far away from the wall they can get (problem #1 solved).
- If they don’t bend their knees enough it will limit how far away from the wall they can get (problem #2 solved).
- If they round their back it will limit how far away from the wall they can get (problem #3 solved).
Trainees should do five good reps at each position as they move further away from the wall. Instruct them to contract their glutes hard at the top of each rep. Once maximum distance has been achieved or a satisfactory hinge has been performed, it’s back to the kettlebell deadlift.
And once the kettlebell deadlift looks good, it’s on to the barbell deadlift.
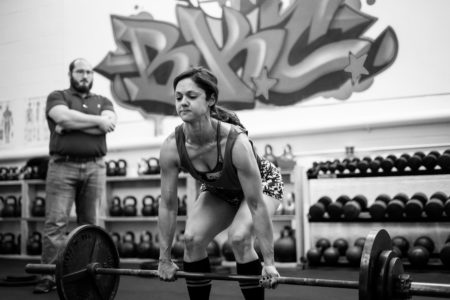
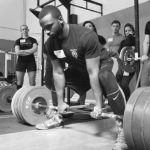
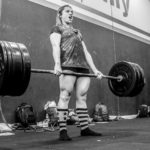
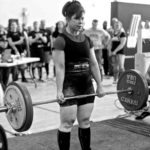
Step By Step Conventional Deadlift
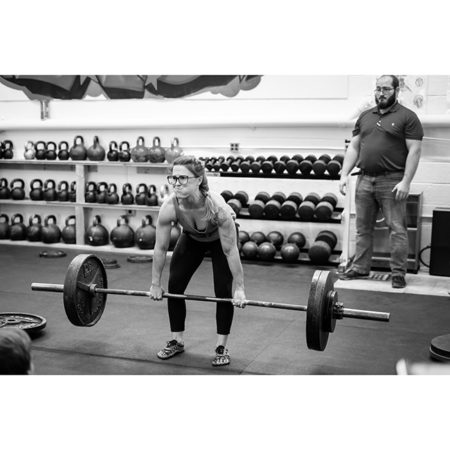
If you look at high level lifters you will find many different deadlifting styles and techniques. Everything from foot spacing to the position of the head, neck, and spine is up for debate; and there’s probably good reason for using any of them. However, for the purposes of this article we will not be getting into any of the deadlift variations or special considerations. We will be looking at the conventional deadlift only, and a very broad method of teaching it to the masses.
- Jump Stance: Start with a “jump stance”. Wherever you would plant your feet to perform a standing vertical jump, that is where you naturally feel most powerful. Take a mental note of the distance between your feet and start there every time.
- 1” from the Bar: Position yourself so your shins are about 1” from the bar. When you reach down, your legs will now be in contact with the bar; be sure not to bump the bar forward.
- Mixed Grip (or not): To prevent the bar from rolling out of your hands (centripetal force) as the weights get heavier, you’ll want to use a mixed grip—one hand facing forward, the other facing back. I recommend switching hands every set to minimize any asymmetries this may cause. You may also use a double overhand grip (for lighter weights) or a hook grip (like weightlifters use) in lieu of the mixed grip.
- Hinge: Hinge down to the bar while keeping a neutral spine (including the neck). A straight line should be formed connecting the head, shoulders, and hips. Maintain this position throughout the entire movement until the bar is returned to the ground and the set is over.
- Breathe and Brace: Before hinging down to the bar, the lifter should take a deep inhale and perform an abdominal brace. Push the abs out and hold the midsection tight. The entire torso should be pressurized and compressed before lifting. Assuming cardiovascular disease is not present, this is a safer way to lift (and a stronger one, too)! Bracing helps to maintain your spinal position and allows for greater contraction of the muscles via the principle of irradiation. That is, as the muscles are tensing maximally, they will recruit neighboring muscles to assist.
- Tighten Up: As you’re bracing and tightening your abs, be sure to tighten everything else too. Pull your shoulders down hard like you were putting your scapula into your back pockets. Crush grip the bar as if your life depended on it. Arms are straight as you pull the slack out of the bar.
- Wedge: Wedge yourself in between the floor and the bar by driving your heels into the ground and pushing your hips forward. As you stand up, keep your arms long and shoulders down. Do not shrug the shoulders or pull them back excessively. The less the bar moves from the ground—the better!
Once your knees and hips are locked out the lift is complete. Return the bar to the ground under control and perform a set of five to ten reps.
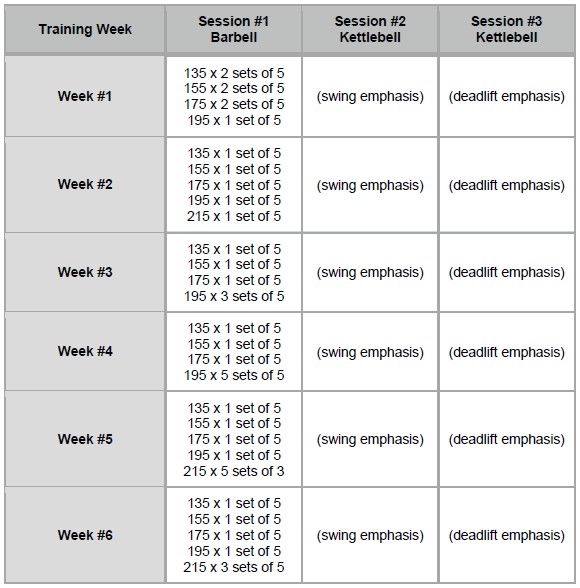
Sample Training Program
This program utilizes both warmup and working sets of five reps. Each set bumps up in ten to twenty pound increments to the working load until form begins to suffer. As you will see below, some weeks back off on the volume, others increase with the end goal being three sets of five at a new PR.
In the example below the loads are estimated for an average 200lb man with little to no experience with a barbell. The trainee performs the barbell deadlift once per week, with the other two weekly sessions serving to pattern the hip hinge via the kettlebell. The details of those kettlebell sessions are outside the scope of this article. Just emphasize both the swing and the deadlift, and include the appropriate amount of upper body press/pull and you can’t go wrong.
Some points to note:
In week one our trainee is able to complete one set of five at 195 but knows he could not complete a second set in good form, so he stops there.
In week five, our trainee has completed the 5×5 and has added weight, but maybe five sets of three is a better call than three sets of five. It’s still fifteen total reps, but they are better quality in sets of three, so do that instead.
The trainee may move back to sets of five the following week.
Conclusion
The fact is we lift things inside and outside of the gym. Sometimes those things outside of the gym are heavy and require immediate attention. It’s better to be prepared for those types of scenarios and armed with proper body mechanics and, of course, strength.
That is a good enough reason to deadlift as any.
You may also like:


Hey Dan! Great article this is really cohesive! I agree with everything you’ve got here. I just had one question.
I always tell my clients it’s a hip hinge and a pull. I like my clients to actually overexert the pull at the top especially if they are underdeveloped in their traps.
This seems to work for them and forces them to stop squatting.
What say you?
Thanks, Alicia founder of A. White Fitness in Hudson, ma
Thanks for the question Alicia. I agree the deadlift is a hip hinge / pull. I don’t typically instruct to “overexert” anything. Perhaps a shrug at the top of the pull for traps I could see.
I’m confused by the way a number of SF programs lack a squat or lunge or other movement where the primary challenge is knee extension. For instance, this article says, “include the appropriate amount of upper body press/pull and you can’t go wrong.” Obviously the deadlift includes some knee extension, but I tend to think of push/pull/squat/hinge as the foundational movements for strength training….
George, we have a good thread on our forum on this subject, see:
https://www.strongfirst.com/community/threads/two-lift-programs-a-conversation-starter.11198/
For those who don’t want to read the thread, my personal opinion is that we don’t need to load all movement patterns. Useful, carryover-ful 🙂 strength can be had with minimalist training. Move in all ways but load only a few.
Dan, great article!
Steve, completely agree!
George, I would agree with your statement re: push/pull/squat/hinge as foundational movements. I would also acknowledge an emphasis on hinging over squatting in my own programming, but that is just personal preference. Similar to how I would prefer to overhead press than bench press. Certainly nothing wrong with either of those movements (squatting and benching are great!) and it’s probably a good idea to include a few cycles of both throughout the year.