The pistol squat is one of the best exercises to develop strong, flexible, and resilient legs, but it also requires skill, practice, and consistency. When I started practicing pistols in 2005, I didn’t have a roadmap or a solid progression, I just kept practicing until it got easier. Once I got acclimated to training pistols, I noticed a few things. One, my lower body strength went through the roof. Two, my overall lower body flexibility significantly improved. Three, I had less tweaks and twinges overall. I simply feel stronger and more durable when I train pistols. This tutorial is the result of years of teaching paired with some amazing progressions I learned when I completed the StrongFirst bodyweight instructor certification.
PART 1: Prying and Weight Shifting
Before we start, you’ll want to prepare your body for the pistol. This isn’t an exercise most people can jump right into. You’ll likely need a combination of ankle mobility, hip mobility, and pistol specific drills.
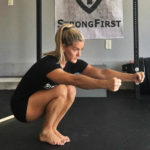
I highly recommend using between an 8kg and 12kg kettlebell when attempting the progressions below as a balance aid. The prying goblet squat is a very powerful drill and also a staple in the StrongFirst SFB curriculum.
Step #1—Prying goblet squat
- Grab a light kettlebell and drop into a deep squat.
- Place your elbows onto your VMOs (inside your knees) and push outward as you try to create space in your hip sockets. You can also pivot side to side to create even more space in your hips.
- Keep your kneecap over the center of your foot as you pry.
- Once you’re in the deep squat position, shift your weight towards your right foot/ankle and drive your knee over the center of your foot as far as possible to improve your ankle mobility. Be sure to keep your heel glued to the floor and then repeat on the left side.
- Focus on prying/weight shifting for 30 to 45 seconds on each side focusing on global hip and ankle mobility. If you have some deficits in your mobility, you can repeat this process two or three times.
Step #2—Weight shifting and using the kettlebell as a counterbalance
- Shift your weight toward your toes and then toward your heels. When you do this, make sure your feet stay glued to the floor.
- As you push the kettlebell away from your body, you should notice you can maintain more of an upright posture. When the kettlebell moves toward your chest, you will notice that your posture is less upright, and a bit more folded/rounded.
Step #3—Feet-together deep squat
- Take the same approach to the squat from earlier, but now move your knees slowly towards one another. Your elbows will eventually be outside your knees.
- Once you can get to the point of owning the deep squat with your feet together, you can focus on weight shifting forwards and backwards. This drill is an integral part of the SFB certification and yields fantastic results.
- When you weight shift forwards, bring the kettlebell to about shin height. You will feel the muscles on the front of your shin activate when you do this.
- When you weight shift backwards, bring the kettlebell to about chest height with your elbows bent.
PART 2: The Rest of the Pistol Puzzle
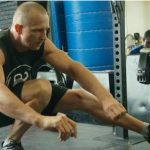
Step #4—Slide one leg forward in the deep squat position (bottom of the pistol)
Once you’ve owned the bottom position of the deep squat with your feet together, it’s time to focus on the bottom part of the pistol.
- Start in a deep squat position with your feet together.
- Weight shift backwards and lift the kettlebell up to about shoulder height. This subtle weight shift will give you enough space to shoot a leg through and start to develop the bottom portion of the pistol.
- When you do shoot your leg through, crush the grip of the kettlebell, sniff in some air to brace your abdominals and then slide the leg forward. Repeat several times alternating between your left and right side.
- Between sets use some fast and loose drills to shake out the tension.
- A key component of this is timing. When you elevate the kettlebell to approximately shoulder height and weight shift simultaneously backwards, it’s the perfect time to slide your leg forward. You may fall onto your butt a few times before owning the bottom position, but that’s part of learning.
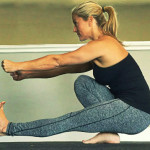
Step #5—Develop the pistol from the top down
You just spent a bunch of time owning the bottom position of the pistol. Now you are going to change gears and start practicing from the top down rather than the bottom up. The first step is to perform all of these drills in a bilateral stance and once you get comfortable move on to a unilateral stance. One quick note—do not spend too much time holding this position on one leg, it’s very difficult to maintain and could potentially fatigue you to the point you cannot finish the rest of the progressions.
- Start by grabbing the same light kettlebell you were using before. Glue your elbows to your side, keep the kettlebell tight to your midsection and go into a deep hinge.
- Imagine you’re curling yourself into a ball. Try to make yourself as “small” as possible.
- In addition to making yourself “small,” don’t forget about utilizing all of your ankle mobility. Try to keep your heel(s) glued to the floor and drive your knee(s) over the middle of the foot (feet).
- Lastly, make sure you use enough abdominal tension to lock your spine into place. Maintaining this spinal position throughout the pistol is vital for abdominal tension and safety.

Repeat all of these steps on one leg and progress to the next step.
Step #6—Work on the eccentric part of the pistol
Once you get into this “small” position on one leg, it’s time to work on the eccentric part of the pistol.
As you descend, you will push the kettlebell away from your body, using it as a counterbalance while you simultaneously shoot one leg through. The timing here is very important. The rate at which you push the kettlebell forward is the same rate in which you shoot your leg through. Once you get to the bottom position, you may have to change the location of the kettlebell to make sure you are centered and not falling backwards.
Step #7—Work on the concentric part of the pistol
Now that you’re in the bottom position of the pistol squat, it’s time to complete the concentric portion of the movement. The bottom position requires a significant amount of lower body strength and abdominal tension. You need to maintain that tension and create a bit more before ascending to the top position.
Once you are ready to ascend to the top position, crush the handle of the kettlebell, sniff in some air to create more abdominal tension, grunt slightly to start the movement, and maintain the abdominal pressure until you’re standing up. Repeat as needed but keep the volume low.
Programming Considerations
Once you nail your first pistol squat, it’s time to talk about programming. To start, I would keep the volume very low. I’d suggest starting with two to three days a week. Here are some examples of sets/reps to consider:
- Day #1
- 2-3 ladders of 3,2,1 reps per side
- Day #2
- 5-8 sets of two reps per side
- Day #3
- 8-10 sets of single reps per side
Conclusion
If you want to build strong, durable, and mobile legs, the pistol squat is one of the best options out there. Take your time and don’t rush the process. If you truly want to master the pistol, I highly recommend you attend an SFB certification to take your bodyweight training to the next level.
Look at the video below for a full instructional on the pistol:
You may also like:
Mike began his career at a medically based training facility where he worked closely with physical therapists, Certified Athletic Trainers (ATCs), acupuncturists, and chiropractors.
Mike holds the following certifications: Certified Personal Trainer through the National Strength and Conditioning Association, StrongFirst Certified Senior Instructor, StrongFirst Elite Instructor, USA Weightlifting Sports Performance Coach, USA Track and Field Level 1 Coach, Functional Movement Screen Certified, and Certified Kettlebell Functional Movement Screen Specialist. In addition, Mike works as an assistant staff instructor for Functional Movement Systems.


Thank you @Mike Perry for this very didactic article!
I’ve started to execute the recommended drills since this week and I’ll already see some significant progress.
This routine helps to identify the weak areas that need more attention (for the time being it is during Drill#4, about finding the right timing to move my leg in front of me), this step by step approach is really paving the road to mastering the Pistol Squat.
As usual, consistency is the key, thanks again for proposing this high quality article!
Now I see that the last video is the whole thing (apologies). I just got my first set of half ways (top down, but not back up). Awesome tutorial, never been able to do that before! I will admit I’ve been close for a couple of years but this tutorial filled in some very important missing pieces. Now for the work on the back to the top.
that video series is ‘gold’! thanks for the detail and clear, concise explanation. StrongFirst = quality instruction and content!
Do you have tips on programming the mobility part to get flexible enough? My mobility is terrible.
This is very helpful! But videos 5 and 7 are the same. Please post the correct video for video 5. Thanks,
Eric
My goal is to be able to perform a bodyweight pistol before the end of the year. My mobility is still lacking
Amazing breakdown with some great tips!
Amazing tutorial for free.
I Love Strongfirst