Introduction
From the outside, the StrongFirst Bodyweight Certification (SFB) may look like the least “shiny” of the three certification StrongFirst offers, but for many it´s also probably the one they will have to work the hardest for, both physically and mentally. But what you get from the SFB when you put yourself in the (possibly) uncomfortable position by preparing for and attending it will amaze you.
In the same way the SFL is not a powerlifting Certification, the SFB is not a gymnastics or calisthenics certification (at least not in the way this term is used today). It´s not about becoming a specialist or about the “bodyweight purity” of the exercises. It’s about getting strong in general.
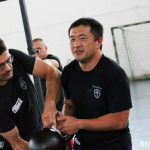
In the beginning of 2019 I decided to finally start working towards the last certification needed for me to attain the StrongFirst Elite designation, the SFB. What held me back from attempting it previously was that besides doing pullups, I never got a real grasp of bodyweight training and lacked proper instruction. But that all changed in March 2019 when we had the very first StrongFirst Bodyweight Course in Germany, taught by StrongFirst Certified Master Instructor Pavel Macek. His ability to translate the Marine Corps Martial Arts Program motto “One Mind, Any Weapon” and apply it to strength training really clicked for me and a lot of the puzzle pieces fell into place.
I struggled to put everything together into a sound program, so I contacted Fabio Zonin, Master StrongFirst Certified Instructor, and asked for his help. I was fortunate to have met Fabio in 2016 at the Plan StrongTM event in Vicenza, Italy. Something that was clear to me from the very beginning was that he is an absolute genius at programming (among many other things). I remembered writing him after the event because I had some more questions about the material presented and he helped me out without hesitation. Back then, I wasn´t exactly sure why he did that for someone he barely knew. I understood when I listened to Sarah Polacco´s interview with him on her “Purposeful Strength” podcast three years later. “It is not only about what we teach, it´s about what we do, how we behave, how we care about the others, and this is why we built such a strong community. Whenever I am kind to someone or try to be helpful, I try to think of what I would expect someone else to do for me if I´m in need.”
Establishing my Baseline
One of the key points Fabio explained to me is not only applicable to training, but anytime in life you want to progress towards a goal: you have to take into account where you are at the moment. You have to make an honest assessment of your current situation. This can be hard because you must take a close look at your deficits and the things you´re not good at. But it´s absolutely necessary if you want to make progress. Just like a map is useless if you don’t know where you are, without an honest assessment, you won’t be able to move toward your goal.
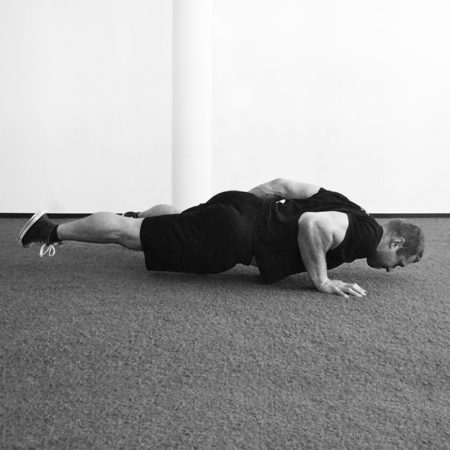
After talking with Fabio I accurately assessed my baselines for the skills tested at the SFB. In the One-Arm Pushup I was able to do two solid reps per side, but wasn´t able to do the One-Arm One-Leg Pushup on both sides. The pullups were no issue, but I knew that my hollow position could be improved. I lack ankle mobility so the pistol was the real challenge for me. But by using a 16kg kettlebell as a counterweight I was able to get an acceptable (but very shaky) rep on both sides. With that established, we moved on to designing the program.
Fabio noted that while it doesn´t really matter which method you use for programming, certain differences and limitations apply to bodyweight training because just adding weight to the bar or grabbing a smaller kettlebell to increase or decrease the load are not options. For bodyweight training, it is better to work with changing levers or use progressions/regressions and variations of the target exercises based on your current level.
Designing the Program for the One-Arm Pushup
We used Plan StrongTM to design the program and determine the average intensity/effort, the volume, their dynamic and distribution. By using different heights of elevation, we got three different intensity zones for the OAPU:
- A medium height where I could do 8-10 reps.
- A lower height that stilled allowed me to do 3-5 reps.
- Regular OAPUs on the floor where I could do 1-2 solid reps.
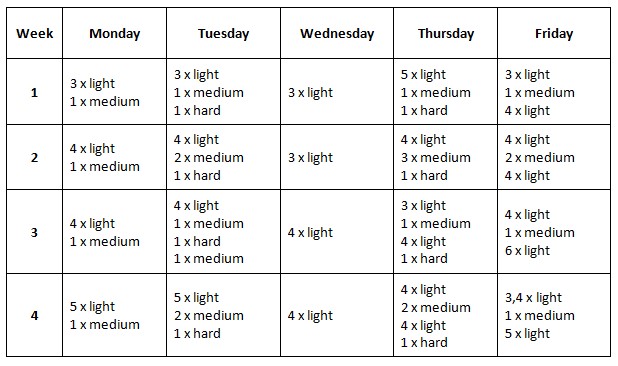
According to the Grease the Groove (GTG) and Plan StrongTM principles, I would do one-third to two-thirds of the maximum repetitions possible per set in each intensity zone. (So, for example, if the easiest intensity zone max rep count were nine, I would do only three to six reps in that zone.) I would then spread the sets throughout the day and practice the OAPU in a GTG fashion five days per week.
The first month was designed like a regular preparation period:
Month #1
For the second month, we increased the volume and average intensity, but built in a taper towards the end of the month, like in a competition period. This allowed me to test my repetition maximum in the OAPU at the end of week 8.
Month #2

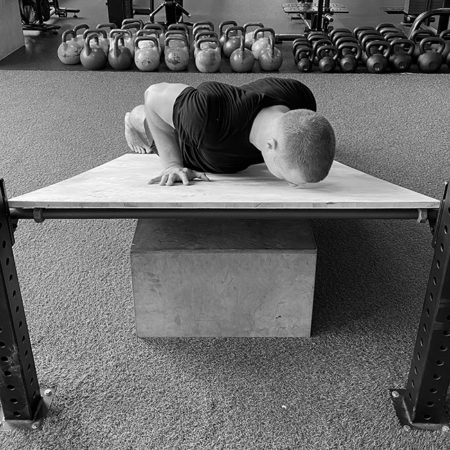
In addition, instead of using a box or barbell as elevation, Fabio wanted me to use a big board, elevated on one side in a power rack. This offered several advantages. My hand and wrist were in the same position as a regular OAPU on the floor, which gave me the same sensory feeling and resulted in better carryover. Also, it allowed me to load the palm and use my hand in the exact same way as in an OAPU on the floor. Finally, the board gave me a point of reference for adjusting my body in space. This allowed me to prevent my hips from losing position (which otherwise would result in a loss of proper body alignment and with that the tension in my midsection).
At the end of the final week of the second month Fabio wanted me not only to test my repetition maximum in the OAPU, but also see if I could do a OAOLPU. The results were stunning.
My rep max in the OAPU went from two to five reps on both sides. And although I wasn´t doing any specific OAOLPU training during that time, I was able to do one rep on each side. With that achieved we changed plans to maintain the strength needed for the OAOLPU while still working on improving the details.
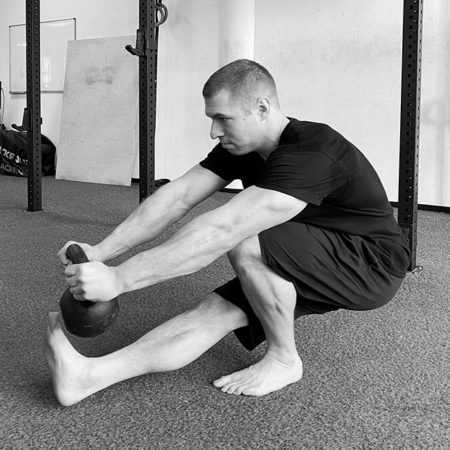
Getting “Pistol Ready”
As for the pistol squat, my biggest issue was my ankle mobility. The Bodyweight Course in Berlin with Pavel was very helpful in that regard, because a lot of time in the beginning of the pistol section was spent on making your feet and ankles “pistol ready.” We covered different stretches and mobility exercises to improve the range of motion of the ankles, always retesting afterwards against a previously set baseline, to see whether a positive change had occurred. Not every drill works for everyone, so be sure to find the exercises that work for you.
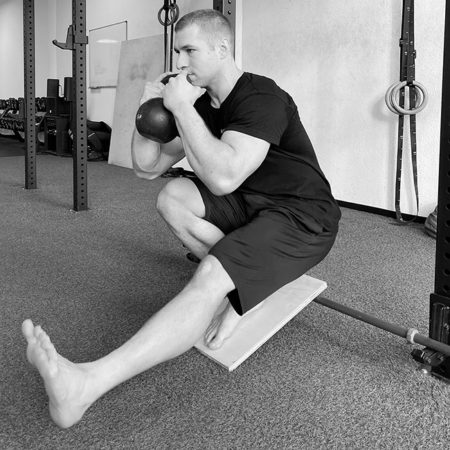
For training the pistol squat Fabio recommended very a simple progression consisting of two steps, for which he had me use the elevated board again. I used a 16kg kettlebell as a counterweight with the board inclined enough that I could do a proper pistol. The first goal was to use the 16kg kettlebell while working on slowly reducing the inclination bit by bit until I could do the pistol on the floor. Once I reached this point, the next step would be to slowly reduce the weight of the kettlebell held for counterbalance until I could do a proper bodyweight-only pistol.
I practiced the pistol three to five times a week, spreading the sets throughout the day in GTG fashion, allowing for a natural waviness depending on how I felt that day. Although I never reached the final bodyweight-only pistol goal, I was able to do a decent pistol with a counterweight, passing the testing standards, which was a real success for me.
In the bigger picture, by earning the SFB instructor designation, and with that my StrongFirst Elite Status, I knew that I had barely taken the first steps on a long journey. Some might confuse “elite” with “elitist”. But a higher rank doesn´t mean more privileges. To me it means more responsibility. I must further develop and refine the skills I have learned while also acquiring new ones. I must represent StrongFirst and that for which it stands. I must honor my teachers and mentors and what they taught me by passing it on to others. As my friend and fellow StrongFirst Elite instructor, Ben Bradbury, said after receiving his black belt in Brazilian jiu jitsu, “Now the real journey begins.”
You may also like:
After taking two workshops in the spring of 2011, he set a goal of becoming an instructor. On the way, he completed his FMS Level 1. When StrongFirst was founded in 2012, he knew that this was the place for him. In only a few short years, from August 2016 to November 2019, he completed his SFG, SFL, SFG II, and SFB, becoming a StrongFirst Certified Elite Instructor and in 2020 he became a StrongFirst Certified Team Leader. He has also attended Plan Strong and Strong Endurance to learn how to create effective training plans for his students.
Sven studied Healthcare Management and works as a strength and fitness coach in Stuttgart, Germany.

That was very helpful! Thank you for taking the time to put this together. It looks like a solid plan and the outcome is wonderful. I may give it a go as I did not master the OAOLPU… yet. Thanks Sven!
Sven,
Thank you for the article. Can you please help me figure out what the numbers are in the charts? For example, “3 x light, 1 x medium” on day 1. Does this mean 3 sets at light intensity, 1 set at medium? Are the 4 total sets done consecutively and repeated throughout the day in GTG fashion? or are the 4 total sets the total amount of sets you do in one day? For example, (using day 1 again) 3 total light sets that day and 1 total medium set for the day?
Thank you for your help! I apologize if you explained this in the article. I double checked and couldn’t figure it out.
Ryan R.
Hey Ryan,
no worries at all! I´m happy to help you out here.
“3xlight, 1xmedium” would be 2 sets total:
– 3 reps/side with the board at medium hight (low intensity/effort zone)
– 1 rep/side with the board at the lower height (medium intensity/effort zone)
Each number stands for a seperate set. I would do 2-7 sets per day, 5 days a week.
Since I did this program in addition to my training for Sinister and because it was my first time really training the OAPU, Fabio and I decided on a somewhat total number of lifts as you would normally do with Plan Strong for a pressing movement.
The lower number of total reps also allowed me to practice daily without having issues with my regenation.
Awesome Sven! Thank you for sharing your journey.
Power to you!
Thank you Axel!
Great ideas
I just remembered one of my neighbors was giving away a door so I got it. Just tried in power rack
So far best single arm push-up is around 17 inches. This is going to help so much between now and November when I go for the SFB cert
Thanks!
Hey Megan,
looks like that was perfect timing!
Awesome that it helped you so much! All the best for your preperation. I´m sure you´ll do great at the cert.
Thanks for always and without hesitation sharing your knowledge!
Looking forward to witness your journey.
Much respect…not because it’s a phrase, but because it’s well earned and deserved!
My pleasure, Tom!
And thank you so much for your kind words! I really appreciate it.
And here I was thinking the board + power-rack was my secret the past few years! 😉
Great article, thank you
I´m glad that you liked the article.
Awesome that you came up with that yourself! I never thought of that before Fabio bringing it up to me.
Great article Sven! And congratulations on becoming SF Elite!
What does “1/2 hard” and “2,4 medium” mean in table 2?
Thank you very much!
It´s the Plan Strong / Soviet nomenclature to describe sets and reps. For sets with identical resp, the first number is the amount of reps per set, the second number the amount of sets you do.
So “1/2” means “2 sets with 1 rep”.
If you have sets with different reps, they are seperated with a comma instead of a dash. So “2,4” means two sets, the first with 2 reps, the second with four reps.
“Hard” and “medium” refer to the intensity zones, or in this case effort zones and with that the variation of the OAPU for the given zone.
In my case, for the hard/high effort zone I used the regular OAPU, for the medium effort zone a slight elevation.
I hope this helps!
Excellent, thank you.
Thank you Nathan! Much appreciated.
That angled board is brilliant! It just makes so much sense. Thanks for presenting Fabio’s method for scaling the OAPU in a more realistic way.
Hey Albert,
I´m glad to hear that you found the article helpful!
Yes, the board really was a brilliant idea by Fabio. It seems like a small detail, but, like I explained in the article, really helped me a lot with figuring out how to move my body in the OAPU.