The get-up is one of the foundational exercises of kettlebell training. I suspect that most people who follow StrongFirst are quite familiar with this exercise. If you are a StrongFirst Certified SFG Instructor, then no doubt you have done many repetitions of them on your own and at your Certification. If you have read Pavel’s book Simple & Sinister, then you know it makes up one of the two primary exercises of that program.
The get-up has earned a reputation for being a great exercise not only for improving total body strength but also for improving shoulder mobility. In the vast majority of cases, I agree. However, there are exceptions to every rule—including here. It is my observation that the standard kettlebell get-up does a wonderful job of improving shoulder mobility—up to a certain point; however, once you start to handle heavy enough weights, it can start to have the opposite effect and cause your shoulder mobility to regress. There is a point when the displaced center of mass of a kettlebell becomes a challenge rather than an assist. I suspect this may be surprising to hear. So, I will begin by explaining my observations and after that, I will offer advice on what to do about it.
Regressions in Shoulder Mobility
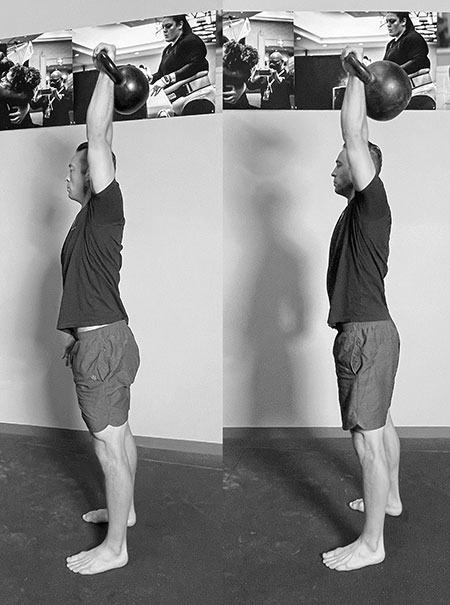
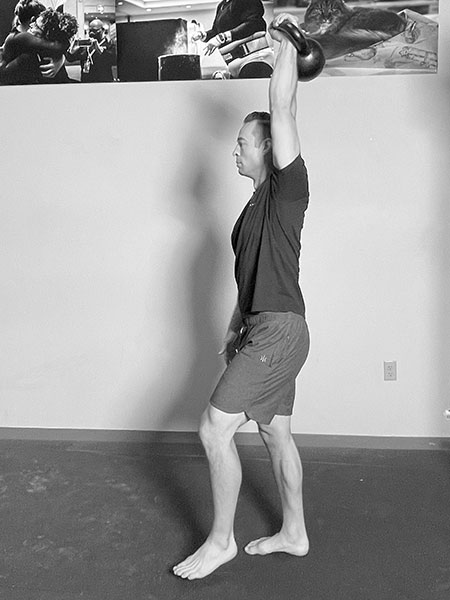
I think identifying a specific position as an example will be helpful here—let’s choose the standing position with your arm overhead, which should be more or less identical for a get-up, a kettlebell military press, or a kettlebell snatch. An ideal position here would be a locked elbow, neutral neck, and the joints of the body all stacked directly on top of each other in a straight line: wrist > elbow > shoulder > hip > knee > ankle.
It is my observation that as long as someone has the requisite mobility, that the position described above is achieved successfully up to a certain size kettlebell. However, things change when the kettlebell starts to get heavier. Most people use cast iron kettlebells, which means that as the kettlebell gets heavier, they also get physically bigger—the spherical part of the kettlebell increases in diameter. At a certain point, the increase in diameter of the kettlebell starts to significantly change the physics of the system and once this happens it becomes difficult, sometimes even unrealistic, to maintain the vertical alignment described above. This is because the center of mass of the heavy kettlebell needs to be directly over the shoulder joint. When the kettlebell becomes physically large enough, it forces the arm forward so that the spherical portion of the kettlebell can sit directly above the shoulder.
Now, couple this forward arm position with the large amount of muscular tension needed to support the heavy kettlebell, and you have a situation where your body is being trained to “stiffen up” or “tense up” outside of true vertical. In fact, your body is being trained to STOP your arm from getting to a true vertical, because if you did hit vertical you’d most likely have to drop the kettlebell (and you would probably be dropping it behind you, which is inherently more dangerous than dropping it in front of you). If you give your body this exposure consistently enough and with enough volume, there is a chance that you could end up with the undesirable training effect of no longer being able to get a true vertical overhead position, because your body has adapted to stop short of it. This, of course, can be incredibly frustrating because it goes against the whole spirit of the get-up, which is to promote both strength and mobility at the same time. Read on to learn at what point I see this happens, as well as my suggestions for how to mitigate it.
When the Kettlebell Gets Heavy
From my experience, once the kettlebell starts to exceed approximately 33% of the lifter’s bodyweight is when the physics of the system start to force the arm into the non-vertical position described above. The 33% figure above is just a guide, and, of course, has some wiggle room in it. The exact point will vary a bit from person to person, so take it with a grain of salt.
For example, I weigh about 190lb (86-87kg) and I feel I can keep a truly vertical arm up to and at 32kg. When I use a kettlebell heavier than 32kg, my arm is usually no longer truly vertical, instead, it needs to be slightly out in front so that the center of mass can be centered above my shoulder joint. I often do get-ups with a 48kg kettlebell and occasionally video myself for technique review. When I watch the videos, I definitely notice a “forward arm position” that centers the kettlebell above my shoulder—it is a subtle forward shift, but it is there.
I have discussed this observation with my wife Mira Gracia (also a StrongFirst Certified Senior Instructor, as well as an International level weightlifter) and she has noticed the same thing. Her weightlifting sport is comprised of the barbell snatch and the barbell clean & jerk. In both cases, the lifter must have extraordinary overhead mobility to perform the lifts effectively. Not only does she possess exemplary overhead mobility, but she also has significant kinesthetic awareness and is keenly tuned into her arm position overhead—in weightlifting even a fraction of an inch can make or break the lift. Her observations when it comes to the size of the kettlebell impacting arm position are consistent with mine. She competes as a 59kg athlete, and according to her, a kettlebell above 20kg starts to force her arm forward of a true vertical.
Putting everything up to this point into context: if you are doing most of your get-up with a kettlebell at or below 1/3 of your bodyweight, then you can probably proceed as you are with no changes recommended. However, if you are frequently using kettlebells heavier than that, possibly even around 50% of your bodyweight or more, then this is something that I think will be applicable to you.
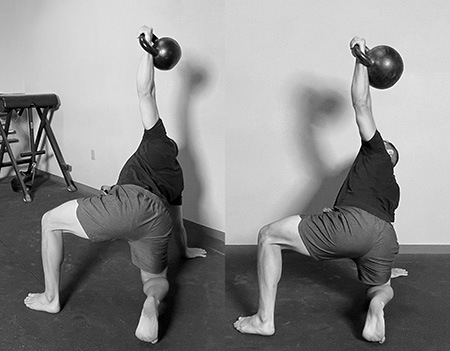
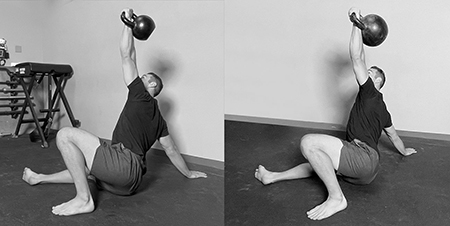
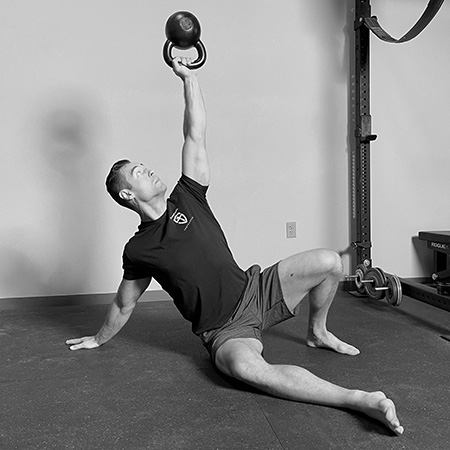
One other clarification before moving on: thus far I have used only the example of the standing overhead position. However, you should expand this to all the positions within the get-up. One other position worth mentioning is the low windmill—this is actually the biggest culprit of a heavy kettlebell causing the arm to shift forward because it is the scariest and most dangerous position if you were to lose (drop) the kettlebell behind you. Due to that, people tend to overcompensate a bit and shift forward in this position even more than the others.
Kettlebell Simple & Sinister™
World’s #1 kettlebell program for beginners and beyond
Five Exercises to Add to Your Training
Before I offer my suggestions of what to do about this dilemma, please note that I am absolutely NOT suggesting that you stop doing get-ups above 1/3 of your bodyweight. What I am going to suggest are five exercises and programming considerations that you should contemplate adding into your regiment. These suggestions are intended to help you maintain those end ranges of shoulder mobility when you do the majority of your get-ups above 1/3 of your bodyweight. Consider doing some (or all) of these five exercises to some degree in your training.
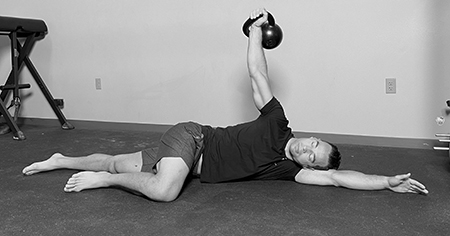
1) Kettlebell arm bar
This is a great drill to include prior to your heavy lifting for the day. It has many benefits, and specific to the context I am talking about here, it will allow you to work on the shoulder position similar to the low windmill in the get-up. Do your best to keep your hips and shoulders stacked on top of each other and maintain as truly vertical of an arm position as possible. I personally use 16-20kg for this and hold for about 60 seconds per arm—of course, you should adjust the weight as prudent for your situation.
2) Banded pull-apart
Most gyms are equipped with “endless loop” style bands. If yours is not, then I suggest you invest in a small set. They are inexpensive, easy to come by, and a good addition to your home gym or gym bag. To perform this exercise, keep your elbows straight, pull your hands away from each other until the band is stretched across your chest, and hold for about a “1-Mississippi” before returning back to the start. The most common way to do these is with your palms facing down towards the floor, but it can be valuable to do some sets with your palms facing upwards to the sky as well. Adjust where you grab the band until you are at your desired difficulty—a wider grip will create less resistance, and a narrower grip will create more. Like the kettlebell arm bar above, I also usually go for 60 seconds per set. This simple exercise will help strengthen and mobilize your shoulders in the same plane as the arm bar above, and is the perfect exercise if you have a desk job and want something to do while at the office to help reduce the effects of “keyboard posture.” If you can get in three sets of these per workday—once in the morning, once on your lunch break, and once in the afternoon—I promise it won’t take long before your shoulders start to feel better than they have in ages.
3) Overhead carries
This one can be pretty simple—get a light to medium kettlebell overhead in any safe manner of your choosing and walk around. Similar to the kettlebell arm bar and banded pull-apart above, a distance that takes you about 60 seconds to complete is a good starting point. When choosing what kettlebell size to use make sure to consider that the point of this is to achieve a truly vertical arm position with no forward deviation. Be sure to pick something light enough that allows you to maintain a true vertical arm position, and that you walk in a controlled manner that keeps it there.
4) Chin-ups
I actually prefer chin-ups over pullups—especially when shoulder mobility is part of the discussion—as it is here. For those not familiar with the difference between the two: during pullups your palms face forward (away from you) and chin-ups are the opposite of that. In other words, as you are passing the bar during a rep, if you are doing a “pullup” you’d see the back of your hands, and if you are doing a “chin-up” you’d see your palms. In this context, I prefer chin-ups for several reasons:
- Chin-ups are typically done with a shoulder width grip or narrower, whereas pullups are usually performed with a grip wider than shoulder width. This means that chins-ups will probably be a better fit for someone wanting to mimic as vertical of an arm position as possible.
- Chin-ups provide a more novel stimulus in terms of joint rotation and angle than pullups. In almost every other overhead movement your palms face forward away from you—in the get-up, kettlebell military press, kettlebell snatch, barbell military press, barbell jerk, barbell snatch, and so on. Pullups just give you “more of the same” compared to all those exercises, whereas chin-ups have the benefit of rotating your shoulders and radioulnar joints into positions they do not get exposure to in all those other exercises.
I will not make specific suggestions for chin-ups as there are already tons of great programs available. However, I will remind you that you need to pay close attention to your technique to make sure you are getting the intended benefit of the exercise:
- Every rep must start from a “dead hang” with no swinging or kipping.
- The elbows must be completely locked at the bottom of each rep.
- The neck should be neutral—just like you should not look up at the kettlebell during the standing position of a get-up, do not look up at the bar at the bottom of a chin-up. Instead, keep your neck neutral, your eyes straight ahead, and make sure your ears are directly between your arms at the bottom position.
5) Specialized variety get-up
Specialized variety occurs when you use a different piece of equipment to perform the same exercise, use the same piece of equipment as usual but choose to hold it differently, or implement a different tempo than you typically do.
This being the fifth of my five suggestions, I think it is worth noting that these are what I see get done the least by most get-up enthusiasts. If you have not done some (or any) of these, then they will be low hanging fruit for you—it won’t take long before you start to reap the rewards.
My first suggestion is to do a get-up with an object that does not cause your arm to change positions. At our gym we have FatBells which were invented by the powerlifter Donnie Thompson, but you could just as easily use dumbbells, or possibly even a barbell. In any of these examples the center of mass of the weight will be directly over your forearm bones rather than behind it like a kettlebell. This means that you can go as heavy as you’d like without worrying about the angle of your shoulder position changing. Also note that you’ll need to be extra careful in some transitions and positions (namely the low windmill) due to the risk of losing the weight behind you as I mentioned previously. Make smart choices with your weights, and do your movements slowly and carefully, and you’ll get big dividends from these.
You can also do bottoms-up get-ups with a kettlebell. This is when you hold a kettlebell by the handle so that the sphere is pointing upward. By going bottoms-up you’ll create the same alignment as the Fatbells or dumbbells described above, and you can do it with the equipment you already use (a kettlebell). The bottoms-up get-up provides the added benefit of grip demand since you must crush the handle the entire time, but also limits you on weight since a very heavy bottoms-up get-up is probably not the safest thing in the world. Consider doing one light bottoms-up get-up per side before proceeding with your regular get-up session.
Finally, you can do a regular get-up with a moderate weight and longer pauses. For this, choose a weight that is light enough to not cause the changes in arm position as described throughout the article. When you get to the low windmill, lunge position, and standing position, pause for 5-10 seconds at each spot. This method will give you more time under tension at each position, and thereby give your body sufficient exposure to the end-ranges of the positions which are not as accessible when the kettlebell gets really heavy.
Conclusion
From the list of exercises above, the kettlebell arm bar and banded pull-apart are the two movements that I recommend doing on a regular basis. These are not particularly taxing or time intensive, which allows them to fit beautifully into a short period of “movement prep” before heavy training. The other exercises could potentially be more fatiguing or time consuming and require more planning to fit in. Overhead carries and specialized variety get-ups, such as bottoms-up or paused get-ups, would fit well into a program as variety exercises or on a light/accessory day. Those interested in heavy specialized variety get-ups could create two to four-week training “blocks” and do get-ups with a kettlebell for the first block and then transition to FatBell, dumbbell, or barbell get-ups in subsequent blocks. Please do not be discouraged from doing heavy get-ups. I enjoy doing heavy kettlebell get-ups and I know many others who do as well. Some people simply enjoy the movement, some are training for a specific challenge such as the “Sinister” goal from Pavel’s book mentioned earlier, and others may enjoy them for other reasons. The point of this article is not to dissuade you from doing heavy get-ups, but rather to support you in your efforts by giving you tools to keep your shoulders mobile and healthy.
Come and train at the author’s StrongFirst Accredited Gym in Portland, OR
Or find a StrongFirst Accredited Gym in your area
You may also like:


He is the head coach of both the strength training and martial arts programs, where they offer classes and private lessons for kettlebells, barbell strength and conditioning, Olympic-style weightlifting, Brazilian jiu jitsu, and kickboxing.


I do agree with your article, I had forearm issues going from 40 to 44kg. In my case dips and forearm rotation helped as complementary work. Now the forearm is much more comfortable and I feel I can grip the bell stronger.
Tony helped me a great deal. I’m 62 years old and have been doing get ups since 2009. This past January, my body just seemed to ‘”forget how to get up from the lunge position.” I’m happy to say that after working with Tony, I am back to using my 20 kg KB and hope to get to a 24 kg, which is 33% of my body weight. In addition to the exercises that Tony mentions above, he had me doing some TRX pulls for shoulder stability which I found helpful.
Those 5 other exercises are great and should be done in addition to the get up, but it’s funny that you are missing the most obvious solution to the problem. It might be heresy to say on this site, but once you lose the vertical arm position, you should move to a dumbbell. Problem solved with no additional exercises. I’d argue dumbbells probably should also be used for heavy overhead carries since you’ve already mentioned the same problem on that exercise too.
I agree. Once I got to 67% body weight I was having lots of issues. I switched to a dumbbell and have zero issues now. My abs also feel more engaged as I have to have the dumbbell perfectly overhead.