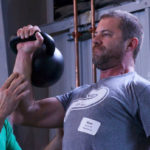
Do you like good food? I mean really good food? I love great food! Have you ever had an epic meal that was so good you could recall exactly when and where it was, even years later? The best meal I have had in years was during my visit to Italy with my comrades from StrongFirst™ Germany, when attending the StrongFirst Bodyweight (SFB) Instructor certification. The evening before the event we were all very hungry (as usual) and had spent more than an hour looking for a place to eat. My good friend and StrongFirst Certified Team Leader Sven Rieger asked StrongFirst Certified Master Instructor Fabio Zonin for a good location that could feed four hungry instructors. Fabio gave Sven the address for a restaurant owned by a friend of his and informed us that we would be treated like kings (which we were).
I believe good cooking is a lot like training. To prepare a good meal you need to follow a recipe. Similarly, when training towards a goal you need to follow a plan. A good meal has different courses that occur in a certain order i.e., 1st course, 2nd, etc. A good (long term) training plan has different protocols that build upon one another and should be followed in order. All the dishes to be prepared for a huge meal have their ingredients and every protocol has its own exercises. Only the highest quality ingredients have the best taste and only exercises conducted with the best possible form and technique are effective.
A good training plan is even more important when it comes to preparing for adventure events such as backpacking, alpine climbing, and obstacle course racing because it’s not as straight forward as preparing for an event like a powerlifting meet or the Tactical Strength Challenge. At StrongFirst we recognize this issue and offer the All-Terrain Conditioning™ seminar which teaches Strong Endurance™ principles and how best to program to prepare for outdoor adventures.
Elite culinary schools teach cooks to be great chefs and every world-class chef has a “go to” ingredient or secret sauce that can make an ordinary dish taste out of this world. With this article, I would like to share a special ingredient to add to your training, the “secret sauce” of adventure training preparation: loaded step-ups.
Loaded Step-Ups
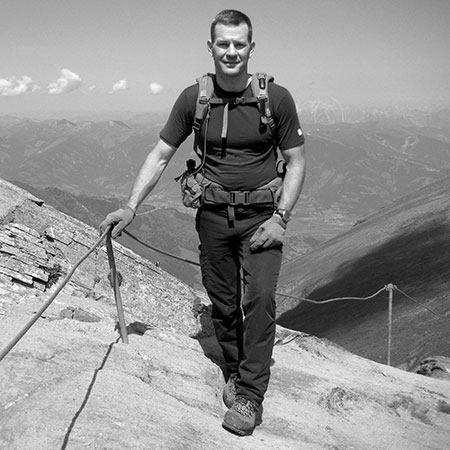
For many years, step-ups have been a training staple for alpinist, mountaineers, and backcountry big game hunters preparing for uphill climbing endeavors. As an outdoor sport enthusiast, I have used step-ups to prepare for hiking and backpacking trips, alpine climbs, and mountain bike marathons as well as general conditioning.
Step-ups as preparation for these kinds of activities make perfect sense. But in reality, they have many uses. They can be a minimalist strength endurance exercise that can easily be added to a strength training program to promote recovery. They can be used as an addition to an endurance-based training program, a replacement for other types of traditional endurance training such as running, especially when during unfavorable conditions like extreme heat, cold, or inclement weather. They are also useful for military personnel on deployments who need to adhere to operational security or for individuals unable to run or jog due to previous injuries.
The early years of my step-up training were highly glycolytic and usually left me feeling tired and sluggish. The so-called “programming” I followed at the time was a linear progression of sorts, with the goal to always do more, go faster, step higher, and carry a heavier load.
I thought there must be another, “smarter” way to train that would deliver results from step-up training without killing myself in the process. Recalling what I had learned at Strong Endurance™ and rereading my manual, I found the outlines to come up with a step-up protocol that delivers strength, endurance, and mental fortitude. I named it Heart Rate Step-Up Training (HRST).
HRST is a heart rate-based protocol that uses pre-determined timed intervals and their respective rest periods. The duration and volume of the training sessions is governed by the individual’s heart rate.
Harald Motz performed two 5-week cycles of the HRST:
First cycle:
- Vest weight 29kg
- Set length 6min (up to 10 sets max)
Second cycle:
- Vest weight of 22,5kg
- Set length 4min (up to 15 sets max)
Each step-up was done in sync with a metronome. Never lost a step on any set. The total number of steps and accumulated vertical height could be calculated easily after a session. Each session length was determined/autoregulated by the ability to recover to a baseline on that particular day (temperature, overall state of rest…)
Calculation example on a maximum set length:
- 6min x 19s/min x 10sets = 1140 total steps
- 1140steps x 40cm box height: 456m elevation gain
- 93kg bodyweight + 29kg vest = 122kg x 1140 steps = 139,08 tons total= 69,54 tons per leg
A huge amount of work can be accumulated via box stepping!
Measured results after 10 total weeks:
- Good 2kg of weight gain
- Resting heart rate went from around 53 to around 48 bpm
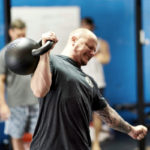
- While on the HRST, Harald performed multiple 5-min snatch tests with the 24kg and 28kg kettlebell along with his Timeless Sinister training with the 48kg and 52kg (3-5 sessions a week)
So, this can be combined with other training very well.
HRST Variables
The first task that I faced with putting together a step-up protocol was to come up with standardized variables that needed to be constant throughout training. This was not as simple as it sounds, due to the many factors that come into play with step-up training. I studied all aspects of the exercise and began testing and assessing variables that could be set in stone before further designing the protocol. This led me to four constant variables: step height, heart rate ranges, tempo, and load.
Step height
This is personalized and needs to be adjusted to each athlete. Since there is no “one-size-fits-all,” extensive testing has shown that 75% of one’s bent knee height (BKH) to be optimal for step-up training. To determine your bent knee height, use the following method.
- While barefoot, sit with one hip on the edge of an upright standing black-roll roller or a low box, approximately 30cm high (your hip must be below knee height while sitting). The bent knee of the opposite leg should be resting on the floor.
- The toes of the foot of the measured leg should be touching a wall, the inside of a doorframe or a Pylo-box. The shin must remain vertical (90 degrees to the floor).
- Use a carpenter’s square or any right-angled object (hard cover book, clipboard, etc.) to measure the height of the bent knee. Use a pencil to mark the height at the bottom of the square touching the wall or door frame. Then measure the distance from the floor to the mark you have made. This measurement is your 100% BKH.
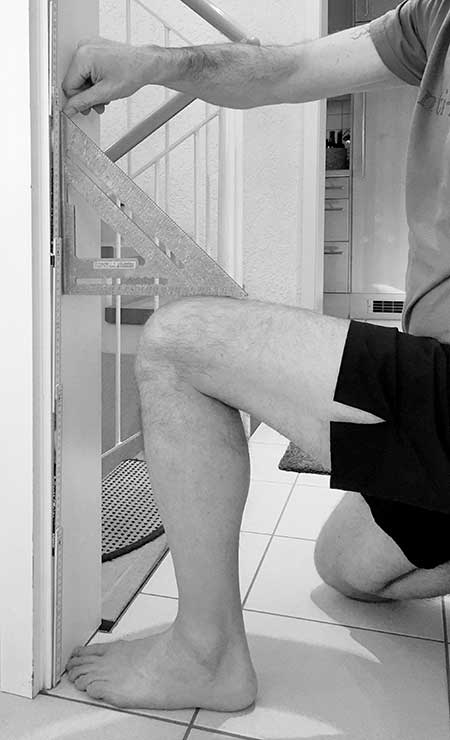
- To find 75% BKH simply multiply this number by 0.75 and round up to the next full centimeter. (100% BKH x 0.75 = step/box height 75% BKH).
Heart rate ranges
There are a diverse number of methods and formulas that are used to determine and/or calculate one’s max heart rate (MHR). The method or formula used to establish this value is not of upmost importance, rather the MHR value that the individual has chosen should be used throughout the training process.
If you have been using a HR monitor in conjunction with your training for some time, the easiest thing to do is simply use the highest HR value that you have recorded during your training within the last six months.
If you are new to HR monitors and HR training, I would suggest that you consult your doctor and possibly perform a cardio stress test to determine your max HR.
Below is an example of an MHR formula (one of many) that may be used to calculate your MHR.
- 202 – (0.55 x Age) = MHR for Men
- 216 – (1.09 x Age) = MHR for Women
Example
A 40-year-old male has calculated his MHR using the formula mentioned above:
202 – (0.55 x 40) = 180 bpm (MHR)
180 x 0.65 = 117 bpm (65% MHR)
NOTE: An MHR calculated by any formula is NOT an accurate means of determining one’s true MHR, and will only provide the user with a “Ball Park” value that may or may not be close to the individual’s true MHR value.
Once the MHR has been determined, i.e., test or formula, a percentage of that value, i.e., 65% is to be calculated and used for HRST Plan 2301.
Tempo
The next variable is the tempo/pace. The tempo is expressed as steps per minute (SPM).
The ideal tempo for stepping under load at this height that can be sustained for repeats of varying length, while still maintaining proper stepping technique, is a “medium” pace of 19 SPM.
In order to monitor and keep the pace constant throughout training, a simple tempo metronome app that can be installed on your smartphone or tablet has proven to be very useful.
In terms of determining the pace, the trailing leg down step, when touching the floor, counts as a full rep and should be matched.
Training load (rucksack weight)
Years of extensive testing have shown that a sturdy rucksack with a padded hip-belt is the best method to load step-ups. Loading a rucksack is much like loading a barbell during weight training—the weight can be changed easily and in small increments. Unlike weight vests, a rucksack with a supportive hip-belt does not put undue pressure on the shoulders and chest which can constrict breathing and become very uncomfortable at higher loads.
There are three training loads (intensities) used for HRST. These loads represent a percentage of one’s bodyweight (BW).
- Men: 15% BW, 20% BW, 25% BW.
- Women: 10% BW, 15% BW, 20% BW.
The optimal training loads for HRST have been found to be 20% BW for men and 15% BW for women. If you are new to step-up training or are un-conditioned it is advised that you begin unloaded and gradually progress to 10, 15, 20% BW loads.
Bodyweight should be measured in the morning upon rising with minimal clothing.
Example
A male with a bodyweight of 80kg using a rucksack loaded at 20% BW = 16 kg ruck (BW x 0.20 = ruck weight).
Stepping Technique
Now that the variables have been set, we can move on to how to properly perform the exercise. Wait a minute, you might be thinking. What’s so difficult about stepping up and down from a box? At first glance this may seem super simple but there are a lot of things happening during this exercise. Step-ups are kind of like the kettlebell swing, it’s a basic exercise that can get very deep the farther it is practiced.
Here are a few major points:
- Steps should be alternated each step and the foot switch is to be made at the top of the box with full hip extension. This technique mimics a natural gait pattern as when we walk or run our steps are alternated and the hip is in extension.
- The entire foot should be placed on the box/step platform. Be mindful NOT to step on the edge of the box (making contact with your mid-foot). Step through the heel and drive your chest up, imagine stepping through the platform in order to attain full hip extension.
- The knee should always track the toes with each step. This follows the StrongFirst standard for performing any kind of squat. There should be no internal rotation of the knee, thus ensuring the muscles of the hip are being properly engaged and the knee is protected.

- The arms should be kept at the sides of the body with minimal arm swing, if any at all. Training the lower body and posterior chain muscles are the focus of this exercise, any added momentum from the arms “helping” to get to the top of the step would be equivalent to kipping when performing a strict pullup.
- Keep your gaze forward toward the horizon, do not allow your upper body to flex forward under the load of the rucksack, keep your chest “up” and your spine neutral.
- Always have your abs “turned on,” keep your lower back flat and pushed into the lumbar pad of the ruck. Do not just “passively” step, maintain tension in your trunk. This will protect your lower spine from injury while stepping under load. Apply the same principles you would when performing a get-up: breathe “behind the shield.”
- The stepping leg should be doing most of the work. Do not let your trailing leg “help” push you up through your toes, i.e., “calf push.”
Mia Farrow was introduced to the HRST in December 2021, shortly after she shared her big endurance goal of running Aconcagua360* with her then strength coach Peter Kirk.
*Aconcagua360/Project Argentina is a 110km FKT speed hike/run from the bottom of Aconcagua to the summit and back down the other side of the mountain, connecting the 2 gates. Start is at 2,800m, summit at 7,000m, and finishing at 2,500m. Current WR for women Solo is at 47 hours nonstop.
The thing she truly appreciated with the HRST is the minimalistic approach, it wasn’t taxing on the body, and it still engaged her in the movement of proper mechanics, proper breathing, and balance and coordination—which she needed for trail running and mountaineering. This was also a good way to add more endurance work without stressing the legs, especially after an injury. Besides, they were in the middle of an extremely hot summer in Sydney Australia—so doing the HRST in the shade vs running for hours in the hot sun was a smarter way to train.
Mia’s first HRST assessment was at 4-minute intervals and it took a few sessions for her nervous system to adjust.
Mia remembered it required focus and patience, being able to relax and breath (inhaling on the 2 steps-up and exhaling on the 2 steps-down) while alternating feet, and it probably took 6-8 weeks to comfortably move through different set-ups based on tempo/pace.
She has equally started enjoying 19 and 24 SPM, her coordination was better and so was her HR recovery.
After 12 weeks, she decided to speed hike / run one of her favourite peaks in Oz, twice in the same day, 3207m elevation gain, some 33km RT. (21 miles 10,521 ft elevation gain.) And it was a success.
With Mia’s words:
“Needless to say, the 3 weeks expedition in Argentina was a huge success and carrying a 20kg pack at such high altitude was comfortable.
I look forward to testing it out at a 50km UTMB race next week and climbing & speed running Mt Aspiring in New Zealand in February.
My resting HR this year has come down to 39-40, from some 47-48 a couple of years ago. Given I’m well into my mid 40’s, it’s a good feeling, to be getting fitter and stronger.”
Breathing Pattern
A biomechanical breathing pattern will help with keeping a steady tempo as well as keeping the HR in a lower range for as long as possible. It is advised to breathe exclusively through your nose while doing step-up training. Breathing through your nose ensures that you are “diaphragmatic breathing.” This is a much-overlooked aspect that should, with practice become second nature. To help ensure that you are breathing exclusively through your nose, you can tape your mouth shut with surgical tape during your step sessions. This is the preferred method, rather than holding a mouth full of water, taping still allows you to swallow.
HRST Plan 2301-A Training Session Procedures
NOTE: HRST Plan 2301-A is a heart rate-based protocol, one of many HRST plans found in the All-Terrain Conditioning™ curriculum. A sports watch is needed to accurately monitor your heart rate throughout training.
Those who do not have an HR monitor and wish to try out this protocol can do so by using an interval timer and following the shaded and *italicized instructions below.
- This plan uses 65% Maximum Heart Rate (MHR) as its recovering heart rate value. The formula and method for determining your MHR can be found above.
- Start your sports watch and begin stepping to the tempo of a metronome app set for 19 beats per minute. Be attentive to keep pace with the tone of the app using the correct stepping technique.
- *Start the interval timer set for 4:00min intervals and 1:30min rest periods.
- *Start the interval timer set for 4:00min intervals and 1:30min rest periods.
- Continue stepping for the entire 4:00min interval. When the interval time elapses, i.e., 4:00 min, immediately stop and push the lap button on your watch to begin the rest period.
- *Stop and begin the 90 seconds rest period.
- *Stop and begin the 90 seconds rest period.
- Stay active during the rest periods. Walk around and breathe exclusively through your nose, shake the tension from your legs with “fast and loose” drills. Do not remove the rucksack! Pay attention to your watch and keep an eye on your heart rate, as soon as your HR drops to 65% MHR, immediately start the next interval. If you meet or exceed 88% of your MHR, stop training. (More stop signs to help you maintain safe training are listed below.)
- *Actively rest for the entire 90 seconds and begin the next interval as soon as the rest period has expired.
- *Actively rest for the entire 90 seconds and begin the next interval as soon as the rest period has expired.
- Be sure to push the lap button on your watch when starting the next interval.
The maximum number of 4-minute intervals per session is 15 which would be 60:00 total minutes of work plus the rest periods. HRST Plan 2301 work intervals vary in length and can be as long as 12 minutes.
Below is an overview of the entry level protocol (2301-A) built around a 4-minute interval:

It is important to note that this is not an all-out glycolytic session. Only go as far as your recovering HR will allow.
Stop Signs
If you come to any of the following stop signs, immediately stop the session.
- Your HR does not drop to 65% MHR before the rest period cut-off time.
- Your HR reaches or exceeds 88% MHR at any time during the training session.
- *You must be able to pass the talk test at any time during training and strictly adhere to the interval times and rest periods. A sure-fire way to ensure this is to tape your mouth shut and breath exclusively through your nose.
- Tempo slows down. For example, you have only completed 72 steps during a 4:00min interval instead of 76.
- You start to breathe through your mouth.
- You feel the need to swing your arms and/or push off with the trailing leg.
- The maximum number of intervals for the protocol have been successfully completed.
Katerina Lisova used Kenneth’s HRST step-up protocol to prepare for climbing Kilimanjaro in September 2023. She has a problem with muscle endurance because she suffers from mitochondrial disease and didn’t know how to prepare her muscles without too much stress on her mitochondria.
The step-up protocol was great choice because she didn’t feel any fatigue after and as a bonus she was able to train without climbing mountains every week, which is really hard to manage when you live in Prague.
Proof that the protocol works is the fact that she did the ascent in 23 hours instead of the usual 5 days (what is normal length) and she was only a little sore next day.
Katerina ensures:
“I will definitely use the same training next time when I will be preparing for something even more challenging… and I am 100% sure I am going to make it.”
Conclusion
Now that you have the ingredients for my “secret sauce,” try adding some to your current training plan and spice it up a bit. If you would like to get the full recipe and learn all the details with in-depth instructions about how to combine training like this with other Strong Endurance protocols, sign up and attend an All-Terrain Conditioning™ seminar and prepare yourself for your next unforgettable outdoor adventure.
Build an amazing capacity for adventure
All-Terrain Conditioning™ Seminar
in person or online
You may also like:

He specializes in mountain adventure training and strength training for triathletes with a philosophy that incorporates elements of Plan Strong™, Built Strong, and Strong Endurance™. He shares his knowledge by teaching the All-Terrain Conditioning™ seminar and offers in-person training for small groups and individuals, as well as online training in both English and German.

This sounds like a great style of training.
Would it be helpful to have an incline on the box, mimicking the steepness of a trail? (vs. a flat surface)
And how can this be progressed? More weight? Faster pace?
Thanks a lot.
Great protocol. I’m excited to give this a try.
Excellent study.
Great article big chief thanks for sharing
great article!
Do you think the same template could be applied to roundhouse kicks on a heavy bag, or you need some movement that’s more grindy then ballistic?
Nice work
Thank you!
Really great article! Thanks for your insights and outlining such a great programm!
Thanks!
Kenneth,
Thanks for putting all the work in to make this a really accessible program. Derek Toshner was kind enough to share the program in his ATC course, and a couple clients of mine have taken to it. A question: One client is working within a limited time frame, so we can’t go much beyond 4 sets. No time to do it on her own. She stays within the parameters listed, and so we’ve gone to the next level. (It’s listed in the program, but I don’t think I’m at liberty to say here, except that it’s the 6-minute table in the chart.) She cannot maintain pace at the new level. Would you advise working up to the new level? Meaning her pace slows, stop the set. Rest, then maybe resume the previous level; the original 4-minutes? My instinct is not to complicate the system, so there’s probably an easy solution that’s not apparent. – Marc